

How to Build a Natural Hair Care Routine That Works
You've bought the curl creams, the leave-ins, the deep conditioners with the good reviews, and your hair still feels dry by Wednesday. That's not a product problem. It's a routine problem. A real natural hair care routine isn't one product doing all the work, it's a sequence of steps repeated in the right order and at the right frequency for your texture.
This guide gives you exactly that: a daily natural hair routine for moisture retention plus a weekly hair routine for natural hair that covers washing, deep conditioning, and protective styling. You'll see what to do each morning, what to save for wash day, and how often to actually shampoo without stripping your curls or coils.
We'll walk through building your routine step by step, from the LOC or LCO method to nighttime protection that actually prevents breakage. Whether you're chasing longer length or just tired of guessing, you'll leave with a system you can repeat every week, not another product to add to the pile.
Know your hair type before you build a routine
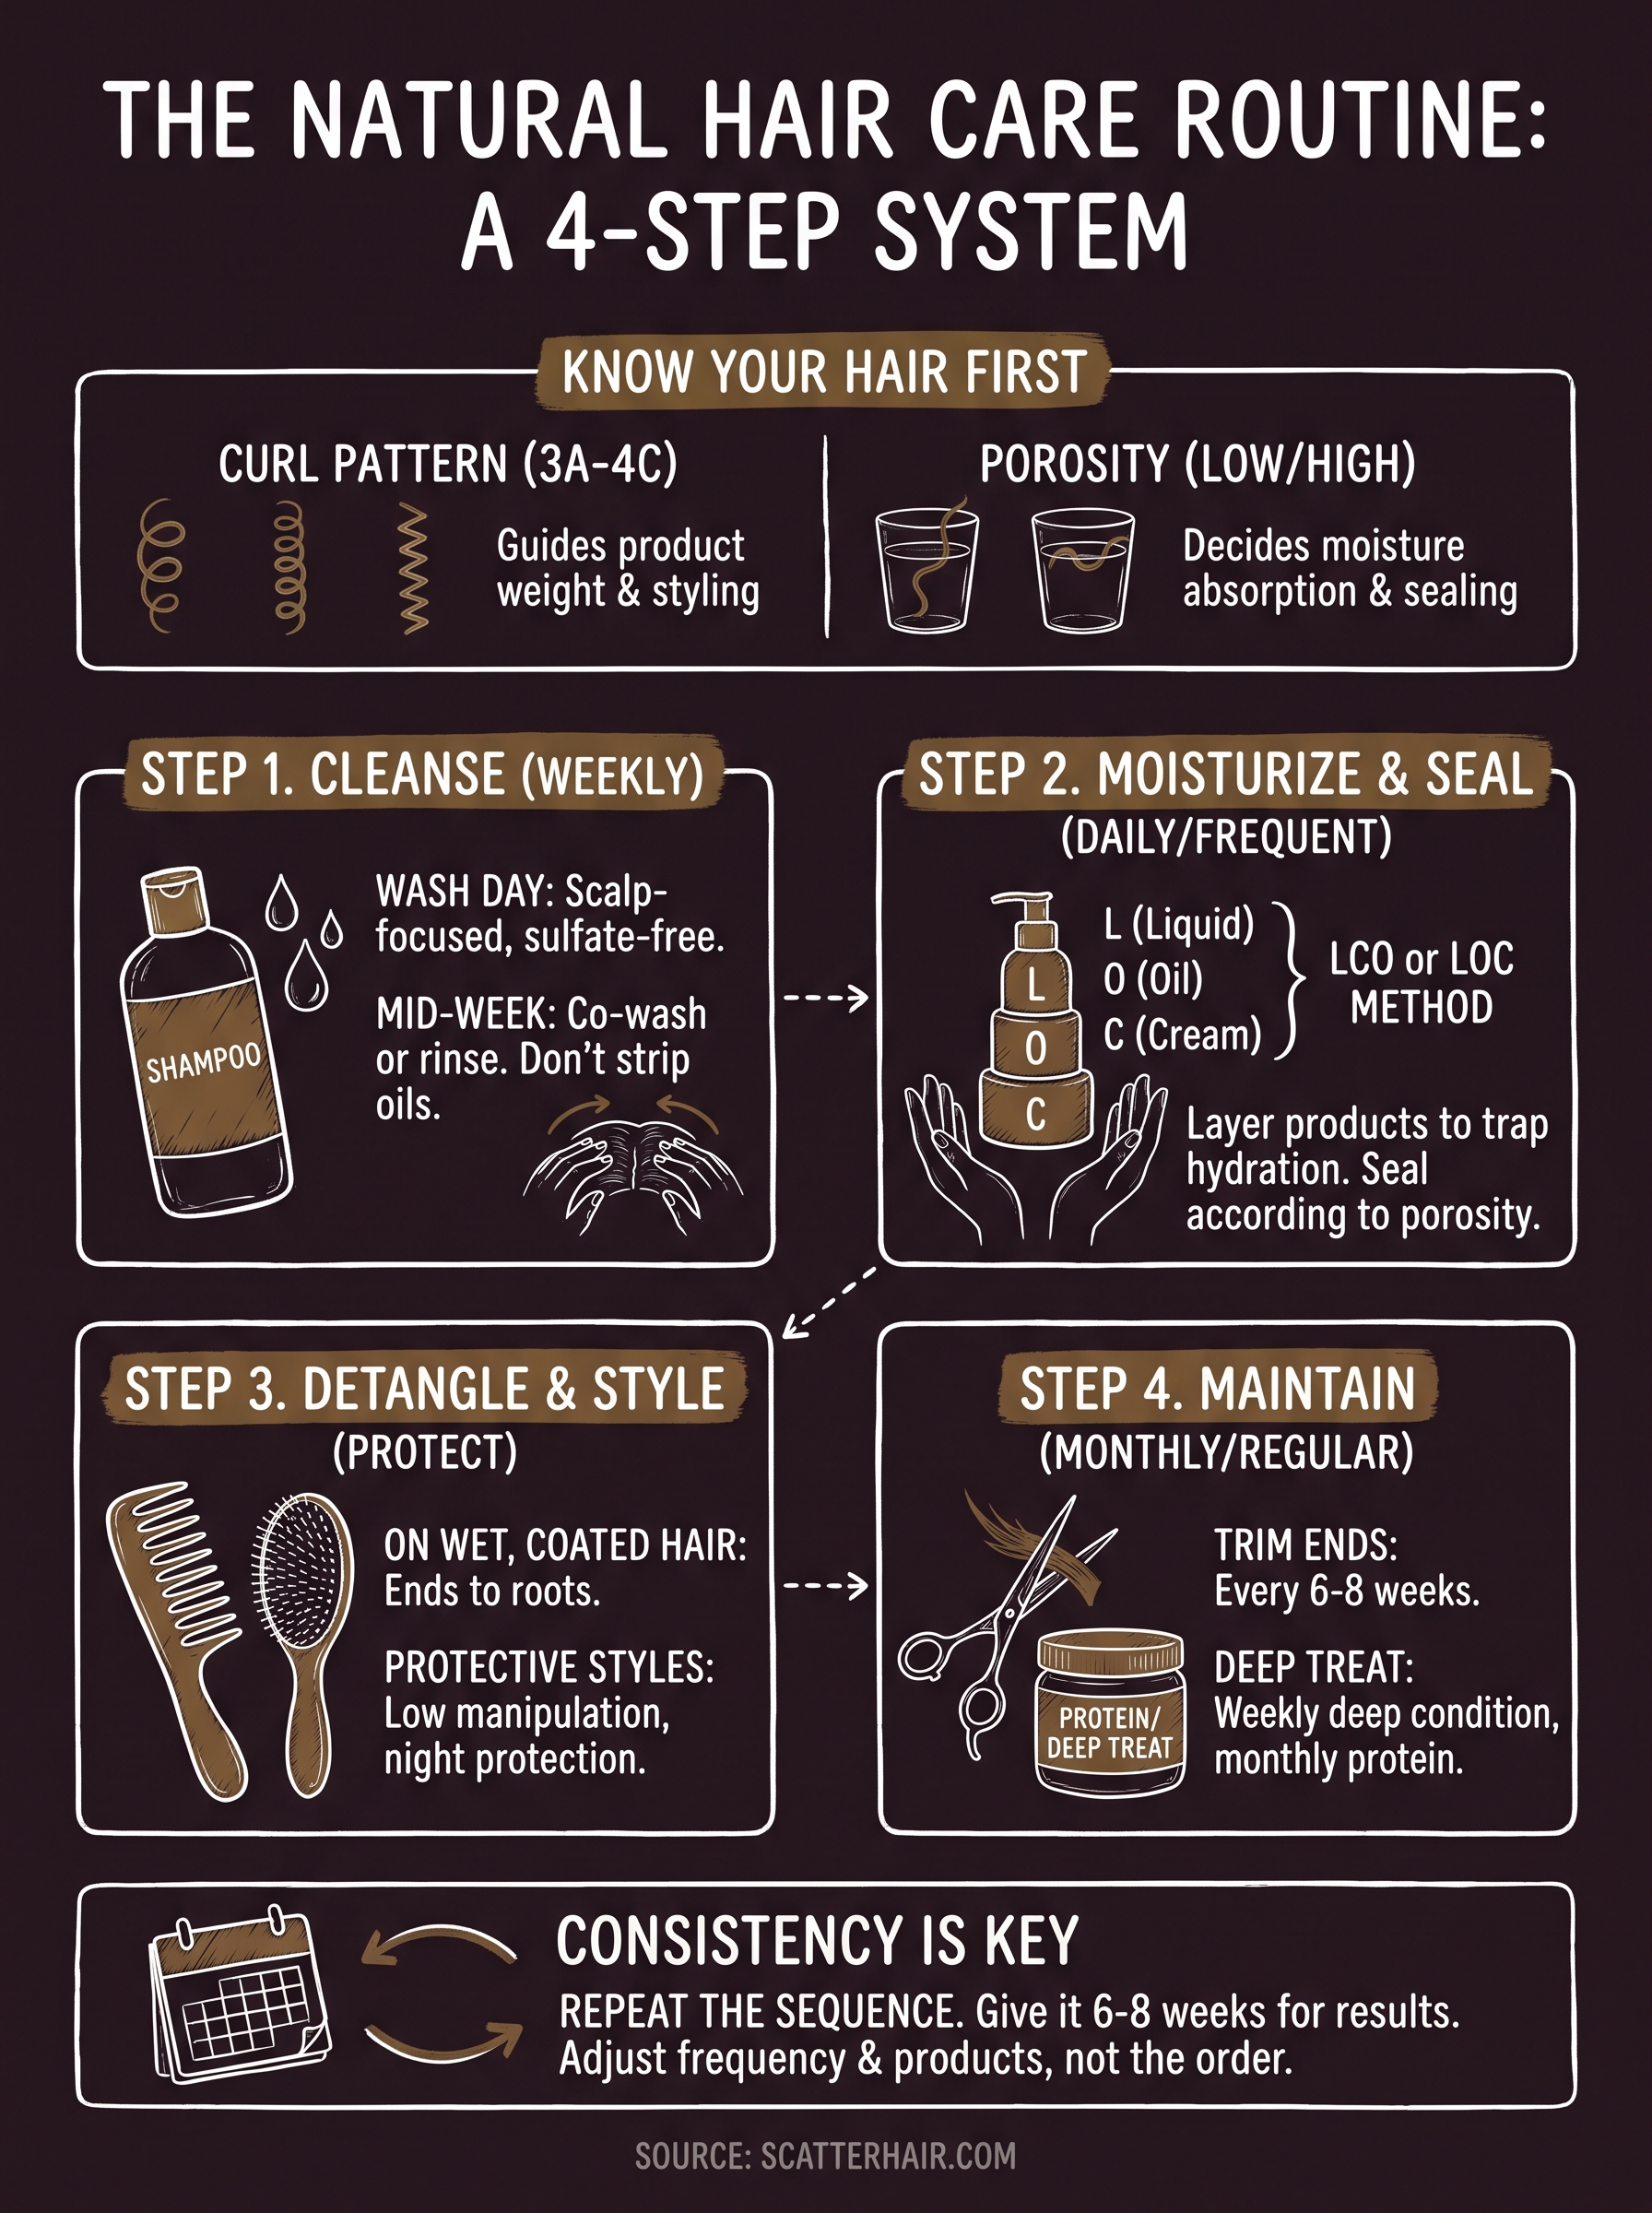
Every natural hair care routine falls apart when you copy someone else's steps without checking if your hair actually matches theirs. A 4C coil and a 3A curl need different water amounts, different protein levels, and different styling pressure. Before you touch a single product, figure out where you land on the curl pattern chart and what your hair porosity is doing, because those two facts decide almost everything else in this guide.
Find your curl pattern
Start by washing your hair, skipping product, and letting it air dry so you see your natural texture without interference. Look at the shape each strand makes as it dries: loose S-waves, springy ringlets, or tight zigzags. This isn't about boxing yourself into one label forever, most heads have two or three patterns mixed together, but it gives you a starting point for product weight and moisture needs.
| Type | Pattern | What it typically needs |
|---|---|---|
| 3A-3B | Loose to springy curls | Lightweight cream, less frequent moisturizing |
| 3C-4A | Tight coils, defined curl | Balanced cream-to-gel ratio, regular sealing |
| 4B-4C | Zigzag, minimal curl definition | Heavy butters, daily moisture, gentle detangling |
Check your porosity too
Porosity tells you how easily your hair absorbs and holds water, and it matters as much as curl shape for a hair care routine for natural hair that actually works. Drop a clean strand in a glass of water: if it sinks fast, you have high porosity and need protein-rich products to fill gaps in the cuticle. If it floats for minutes, you have low porosity and need heat to help products absorb at all.
Your curl pattern picks your products, but your porosity decides how well they actually work.
Skip this step and you'll keep buying based on what worked for an influencer with completely different hair. Match your products to your actual pattern and porosity, and the rest of the routine below will make a lot more sense.
Step 1. Cleanse your scalp and strands
Cleansing is where most natural hair routine attempts go wrong, either from washing too often and stripping every bit of moisture, or washing too rarely and letting buildup smother the scalp. The goal isn't a squeaky-clean scalp, it's a clean scalp with intact natural oils still doing their job.
Pick your wash frequency
Most textured hair does best with a weekly hair routine for natural hair built around one full wash day, with a co-wash or rinse mid-week if your scalp gets oily or you sweat heavily. Higher porosity hair can sometimes stretch to ten days between washes since it holds moisture longer.
- Wash day: clarifying or sulfate-free shampoo, focused on the scalp
- Mid-week: co-wash or water rinse if needed
- Between washes: dry shampoo at the roots only, never on lengths
Cleanse the right way
Section your hair into four to six parts before you start, and apply shampoo directly to the scalp using your fingertips, not nails. Let the lather run down the lengths as you rinse instead of scrubbing strands against each other, which causes tangling and breakage.
A clean scalp grows healthy hair, but scrubbed lengths just create split ends.
Finish with cool water to help the cuticle lie flat before you move into conditioning, since this single step makes the next stage of your daily natural hair routine noticeably easier.
Step 2. Moisturize and seal in hydration
Moisture is the entire point of a natural hair care routine, since textured hair's twists and coils make it harder for scalp oil to travel down the shaft the way it does on straighter hair. That's why you layer moisture in deliberately instead of hoping one leave-in handles everything.
The LOC or LCO method
Apply products in a sequence that traps water in the strand instead of letting it evaporate within the hour. Use LOC (liquid, oil, cream) if your hair is low porosity and needs lighter layers, or switch to LCO (liquid, cream, oil) if you're high porosity and need the oil last to lock everything in.
- Liquid: water or a water-based leave-in, applied to damp hair
- Oil: a lightweight oil like jojoba or grapeseed
- Cream: a curl cream or butter to define and hold
Moisture without a sealant just evaporates by lunchtime.
Seal for your porosity
High porosity strands lose water fast, so seal heavier with butters like shea or mango right after your liquid step. Low porosity strands resist absorption altogether, so warm your products between your palms first, or apply them to soaking wet hair so the cuticle stays open long enough to let moisture in before you seal it shut.
Step 3. Detangle and style with protection
Detangling is where a lot of length gets lost, usually because it happens on dry hair with a fine-tooth comb instead of on wet, product-coated strands with a wide-tooth tool. Treat this step as part of your natural hair care routine, not an afterthought before styling.
Detangle on wet, coated hair
Work in the same sections you used for washing, starting at the ends and moving up toward the root so you're never pulling a knot through the whole strand. Use your fingers first to break up major tangles, then follow with a wide-tooth comb or detangling brush while your leave-in and oil are still slippery on the strand.
Detangle from the ends up, and you'll never fight a knot with your whole arm.
Style with protection built in
Once your hair is tangle-free, style into something that keeps ends tucked away from friction, since exposed ends are the first place breakage shows up.
- Twist-outs or braid-outs for defined curls without heat
- Bantu knots for a heatless coil pattern
- Low buns or braids when you need hair off your face for the day
- Satin or silk scarf over any style before bed
This stage of your hair routine for natural hair doesn't need to look elaborate. It just needs to protect what you spent the last two steps hydrating, so it survives until your next wash day instead of unraveling by Thursday.
Step 4. Maintain length with trims and treatments
Growth isn't just about length, it's about keeping what you already have from snapping off before it counts. A natural hair care routine for hair growth only works if you pair moisture and protection with regular maintenance, because even the best wash day routine can't fix hair that's breaking faster than it grows.
Trim on a schedule, not a whim
Split ends don't stay put, they travel up the strand and cause more breakage the longer you ignore them. Check your ends every four to six weeks by twisting a small section and looking for frayed tips or thin spots, then trim only what's damaged instead of cutting length across the board.
- Dust ends every 6-8 weeks if hair looks healthy
- Trim visible split or frayed ends immediately, don't wait for a full session
- Skip trims only if you're doing regular protein treatments to reinforce weak points
Add protein and deep treatments monthly
Protein treatments rebuild the cuticle's structure, which matters most for high porosity hair that loses strength through constant water exchange. Deep condition weekly on wash day, but add a protein treatment once a month, or every other week if you're heat styling or coloring often.
Trims remove damage, protein prevents it, and you need both to actually see length.
Build this into your natural hair care routine at home the same way you'd schedule anything else you don't want to skip, on the calendar, not "whenever I remember."
Making the routine your own
A real natural hair care routine isn't a rigid checklist, it's cleansing, moisturizing, protecting, and maintaining, repeated in an order that respects your porosity and curl pattern. You now have the four steps. What's left is testing them against your own hair for a few wash cycles and adjusting the frequency, the products, and the sealing method until Wednesday dryness stops being a thing you expect.
Give it six to eight weeks before you judge results. Hair responds slowly, and swapping steps every wash day just resets your progress back to zero. Track what you do on wash day, note how your hair feels three days later, and tweak one variable at a time instead of overhauling everything at once.
If you want products built specifically for textured hair instead of generic formulas stretched to fit every curl type, see what Scatter is building for wash day and sign up before the 2026 launch.