

How to Build a Natural Wavy Hair Routine
Your waves look great one day and fall flat the next, and you can't figure out why. Most of the time it comes down to sequence and product, not your hair itself. A natural wavy hair routine only works when each step supports the next, from how you cleanse to how you sleep on it, and skipping or reordering even one step can undo everything else you did right.
This guide gives you the exact order to follow, what each step is actually doing for your waves, and where frizz control usually breaks down. You'll get a realistic routine you can repeat, not a list of forty products you're supposed to buy at once. The goal is defined waves that hold up through the day without feeling stiff or crunchy.
We'll walk through washing, styling while wet, drying, and refreshing between washes, plus the small habits that separate a good wash day from a frustrating one. If you're building or rebuilding your wavy hair natural routine from scratch, this is where to start, and it's the same thinking behind what we're formulating at Scatter for textured hair that actually cooperates.
Why your wave pattern needs its own routine
Waves sit in an awkward middle ground. They're not straight enough to skip products, and they're not curly enough to handle the heavy creams and gels that work on tighter curl patterns. That in-between texture is exactly why a natural wavy hair routine built for curls or straight hair usually backfires on you. Too much product weighs waves down into limp strands by noon. Too little, and you get frizz with zero definition. The routine has to match the actual shape of your hair, not a generic "textured hair" category.
Know your wave type
Waves get classified into three subtypes, and each one behaves differently under the same product or technique. Knowing yours changes how much product you use and how you dry it.
| Wave Type | What It Looks Like | Main Challenge |
|---|---|---|
| 2A | Loose, barely-there S-shape, mostly at the ends | Falls flat fast, weighed down easily |
| 2B | More defined S-pattern, starts higher up the shaft | Frizzes at the crown, needs light hold |
| 2C | Well-defined waves bordering on loose curls | Frizz and tangling, needs more moisture |
Type 2A hair drowns in the same amount of cream that a 2C wave needs just to hold its shape. If you've been using one product amount across the board, that mismatch alone could explain your inconsistent results.
Why one-size-fits-all routines fail waves
Generic routines tend to borrow steps from curly hair care, since waves and curls get lumped together in most product marketing. But wave definition depends on lighter layering and faster drying than curls typically need, since wave strands are usually finer and hold less curl memory. Follow a curl routine step for step and you'll end up with product buildup and waves that look wet all day instead of styled.
Waves need less product, applied more precisely, than curls do, and that single difference is where most routines go wrong.
Porosity plays into this too. High-porosity wavy hair soaks up moisture fast but loses it just as fast, so it needs lightweight leave-ins reapplied more often. Low-porosity waves resist product absorption, so heavier creams just sit on top instead of sinking in. Neither extreme gets solved by copying someone else's five-step routine off a video, because their porosity and wave pattern are probably different from yours.
What your waves actually need
Strip it down and waves need four things done consistently: gentle detangling, moisture without weight, product applied at the right saturation point, and a drying method that doesn't disturb the pattern once it's set. Every step in this guide maps to one of those four needs, and none of them work well in isolation. Rushing the drying step undoes careful styling. Skipping detangling means your styling product fights knots instead of shaping waves.
Consistency matters more than any single product you buy. A wavy hair natural routine built around your actual wave type, repeated the same way each wash day, will outperform an expensive product lineup applied inconsistently. The steps below give you that repeatable structure, starting with the part most people get wrong first: how you detangle before water ever touches your hair.
Step 1. Detangle before you wash
Tangled hair fights every product you put on it after washing, so detangling has to happen before water and shampoo enter the picture, not during the shower when your waves are already saturated and fragile. Wet wavy hair stretches and snaps easily, and running a brush through soaked knots is one of the fastest ways to create breakage and frizz that no styling product can fix later. Do the detangling work dry, or at least before your hair is dripping, and you protect the wave pattern before it ever gets tested by a comb.
Detangle dry and gently, because wet, snarled waves break before they ever get the chance to hold a curl.
Work in sections, not all at once
Grab your hair in four to six sections using clips or hair ties, and work through each one separately instead of attacking the whole head at once. Sectioning your hair keeps you from missing knots buried underneath the top layer, which is usually where the worst tangles hide. Start at the ends of each section and work upward toward the roots, never the other way around, since pulling from root to tip drags every knot below it into a tighter mess.
Pick the right tool for your wave type
A wide-tooth comb or a detangling brush with flexible bristles does the job without ripping through your strands. Skip fine-tooth combs and stiff paddle brushes entirely, since they catch on wave patterns and pull hair out at the root. For finer 2A waves, a wide-tooth comb alone usually gets you through in a few minutes. Thicker 2C waves often need a leave-in detangler or a light oil sprayed on first to help the comb glide instead of snag.
A quick pre-wash detangle checklist
- Section hair into four to six parts and clip each one up
- Spray a light detangling mist or oil if hair feels dry or knotted
- Start combing at the ends, moving upward in small sections
- Switch to fingers for any stubborn knots instead of forcing the comb through
- Confirm each section is fully smooth before releasing it
Get this step right and everything downstream, the wash, the styling, the drying, goes faster and looks better. Rushing it here is the most common reason people end up fighting frizz they never needed to deal with in the first place.
Step 2. Cleanse and condition without stripping moisture
Once your hair is detangled, the next job is washing without undoing that work. Standard shampoo strips the natural oils your waves need to hold their shape, leaving you with frizz by the time you step out of the shower. Most drugstore formulas rely on sulfates, harsh detergents that clean fast but take moisture with them, which is exactly what a wave pattern can't afford. Cleansing has to remove product buildup and scalp oil without touching the moisture your strands are depending on to stay smooth and defined.
A sulfate-free wash keeps the moisture you fought to lock in during detangling instead of rinsing it straight down the drain.
Choose a sulfate-free cleanser
Switch to a sulfate-free shampoo and you immediately cut down on the dry, frizzy aftermath that heavier detergents cause. Look for labels that list gentler surfactants like cocamidopropyl betaine or decyl glucoside instead of sodium lauryl sulfate. According to the American Academy of Dermatology, gentler cleansers reduce irritation and moisture loss, which matters even more for wavy hair that's already prone to dryness at the mid-lengths and ends. Wash only your scalp, not the full length of your hair, and let the lather run down the strands naturally as you rinse.
Condition where it counts
Condition every wash, no exceptions, and focus the product on your mid-lengths and ends rather than your roots. Roots get enough natural oil from your scalp; the ends are where dryness and frizz actually start. Leave the conditioner on for two to three minutes before rinsing, since that's roughly how long it takes for the ingredients to actually penetrate the strand instead of just coating it.
Rinse temperature matters more than people think
Finish with cool or lukewarm water instead of hot. Hot water opens the hair cuticle and lets moisture escape right after you've worked to lock it in, while cool water helps the cuticle lie flat, which is part of what gives waves their shine and reduces frizz before you've even applied a single styling product.
A wash-day checklist
- Wet hair fully before applying any product
- Use a sulfate-free shampoo focused on the scalp only
- Apply conditioner from mid-length to ends and leave it for 2-3 minutes
- Detangle again gently with fingers while conditioner is still in
- Rinse with cool or lukewarm water
Get cleansing and conditioning right, and you walk into the styling step with hair that's already primed to hold definition instead of fighting you.
Step 3. Apply styling products to soaking-wet hair
Dripping wet hair, not towel-dried or damp hair, is the correct canvas for styling product. Soaking-wet application lets product distribute evenly along the strand instead of clumping on the surface, and the extra water actually helps activate ingredients like glycerin that pull moisture into the hair shaft. Most people towel their hair half-dry out of habit before reaching for product, and that single habit is why their waves end up frizzy and undefined by midday.
Water is your first styling product, and skipping it means every cream or gel you add afterward has to work twice as hard.
Layer in the right order
Go from lightest to heaviest so each layer can actually do its job instead of getting blocked by the one before it. A leave-in conditioner goes on first to lock in moisture, followed by a lightweight cream for softness and definition, and finished with a gel or foam for hold. This is the LCO method (leave-in, cream, oil or gel), and reversing the order, gel first, leave-in last, leaves your waves stiff without the flexibility that makes them look natural.
- Apply leave-in conditioner section by section while hair is still dripping
- Add a pea-to-quarter-sized amount of curl cream, scrunching upward into the ends
- Finish with gel or foam only where you want more hold, usually the crown and part line
- Avoid touching hair again until it's fully dry
Use the praying hands technique
Smooth product between your palms first, then run your hands down each section like you're praying, closing your hands around the strand as you go. Praying hands application distributes product evenly without disrupting the wave pattern the way rubbing or scrunching too early can. Once you've coated a section, scrunch gently upward from the ends toward the scalp to encourage the wave to clump instead of separating into frizzy strands.
Fewer larger sections work better than dozens of tiny ones, since over-handling wet waves is what causes frizz before you've even started drying. Four sections, worked once each, beats twelve sections fussed over repeatedly.
Step 4. Dry your waves without causing frizz
How you dry your waves matters just as much as what you put on them, since disturbing the pattern while it's still setting undoes everything from the styling step. Rubbing a regular towel over wet waves roughs up the cuticle and creates the exact frizz you spent the last two steps trying to prevent. The goal is to remove excess water without touching or moving the strands more than necessary, letting the wave clumps you shaped stay intact while they dry into their final shape.
The less you touch your waves while they dry, the more definition survives once they're fully dry.
Plop or wrap before you diffuse
Grab a microfiber towel or an old cotton t-shirt, lay your hair in the center, and fold the fabric up around it to cradle the shape without rubbing. This technique, often called plopping, absorbs water while your waves set undisturbed for 10 to 20 minutes. Plopping wavy hair works especially well for 2B and 2C patterns that need extra help holding clumps together before any heat gets introduced.
Diffuse on low heat, close to the scalp
After plopping, switch to a blow dryer with a diffuser attachment set on low or medium heat. Cup sections of hair in the diffuser bowl and hold it close to the scalp, letting the waves rest inside instead of blasting air across loose strands. High heat and direct airflow are what separate a clean wave pattern into frizzy, disconnected pieces, so patience here pays off more than speed.
A drying checklist
- Plop hair in a microfiber towel or t-shirt for 10-20 minutes
- Diffuse on low or medium heat, cupping sections close to the scalp
- Dry until roughly 80% dry, then let the rest air dry undisturbed
- Avoid touching, scrunching, or flipping hair once it's set
- Skip regular towels and cotton pillowcases that rough up the cuticle
Stop the diffuser once your hair reaches about 80% dry and let the last stretch finish on its own. Forcing full dryness with direct heat tends to flatten the crown and frizz the ends right when your waves are closest to being done. Air-drying wavy hair the rest of the way protects the shape you worked to build through the wet styling stage, and it's the step that finally locks your natural wavy hair routine into place before you move on to keeping it fresh between washes.
Step 5. Protect and refresh your waves between washes
Washing every single day undoes most of the work from Steps 1 through 4, since daily shampoo strips the moisture you just spent an hour locking in. Most wavy hair looks and behaves best on a two to three day wash cycle, which means the real skill in a natural wavy hair routine shows up in what you do between washes, not just on wash day itself. Sleep, humidity, and everyday friction all chip away at your wave pattern if you don't build in a few protective habits.
Sleep without flattening your waves
Swap your cotton pillowcase for silk or satin, since cotton pulls moisture out of your strands and roughs up the cuticle every time you turn over in your sleep. Before bed, gather hair loosely into a pineapple, a high, loose ponytail at the crown, so the waves at the top don't get crushed flat overnight. A silk bonnet or scarf works even better if your hair tends to frizz against fabric.
Protecting your waves overnight matters as much as anything you apply in the shower, since eight hours of friction can undo a good wash day.
Refresh day-two and day-three hair
Mist your waves with a water and light leave-in mix rather than reaching for a full re-wash. A small spray bottle filled mostly with water and a splash of your leave-in conditioner reactivates the product already in your hair without stripping it out. Scrunch gently upward the same way you did after the initial styling, then let it air dry or hit it with the diffuser on low for a minute or two.
A between-wash refresh routine
- Day 1: sleep with hair pineappled or in a silk bonnet
- Day 2: mist with water and leave-in, scrunch upward, air dry
- Day 3: repeat the mist and scrunch, add a small amount of gel to the crown if it's fallen flat
- Day 4 or 5: wash again, starting back at Step 1
Watch for signs you're overdoing it
Buildup shows up as waves that look dull, feel coated, or refuse to hold any shape no matter how much product you add. That's usually a sign you've refreshed one too many times without a full wash, and your best move is to reset with a clarifying wash before starting the whole natural wavy hair routine again from Step 1.
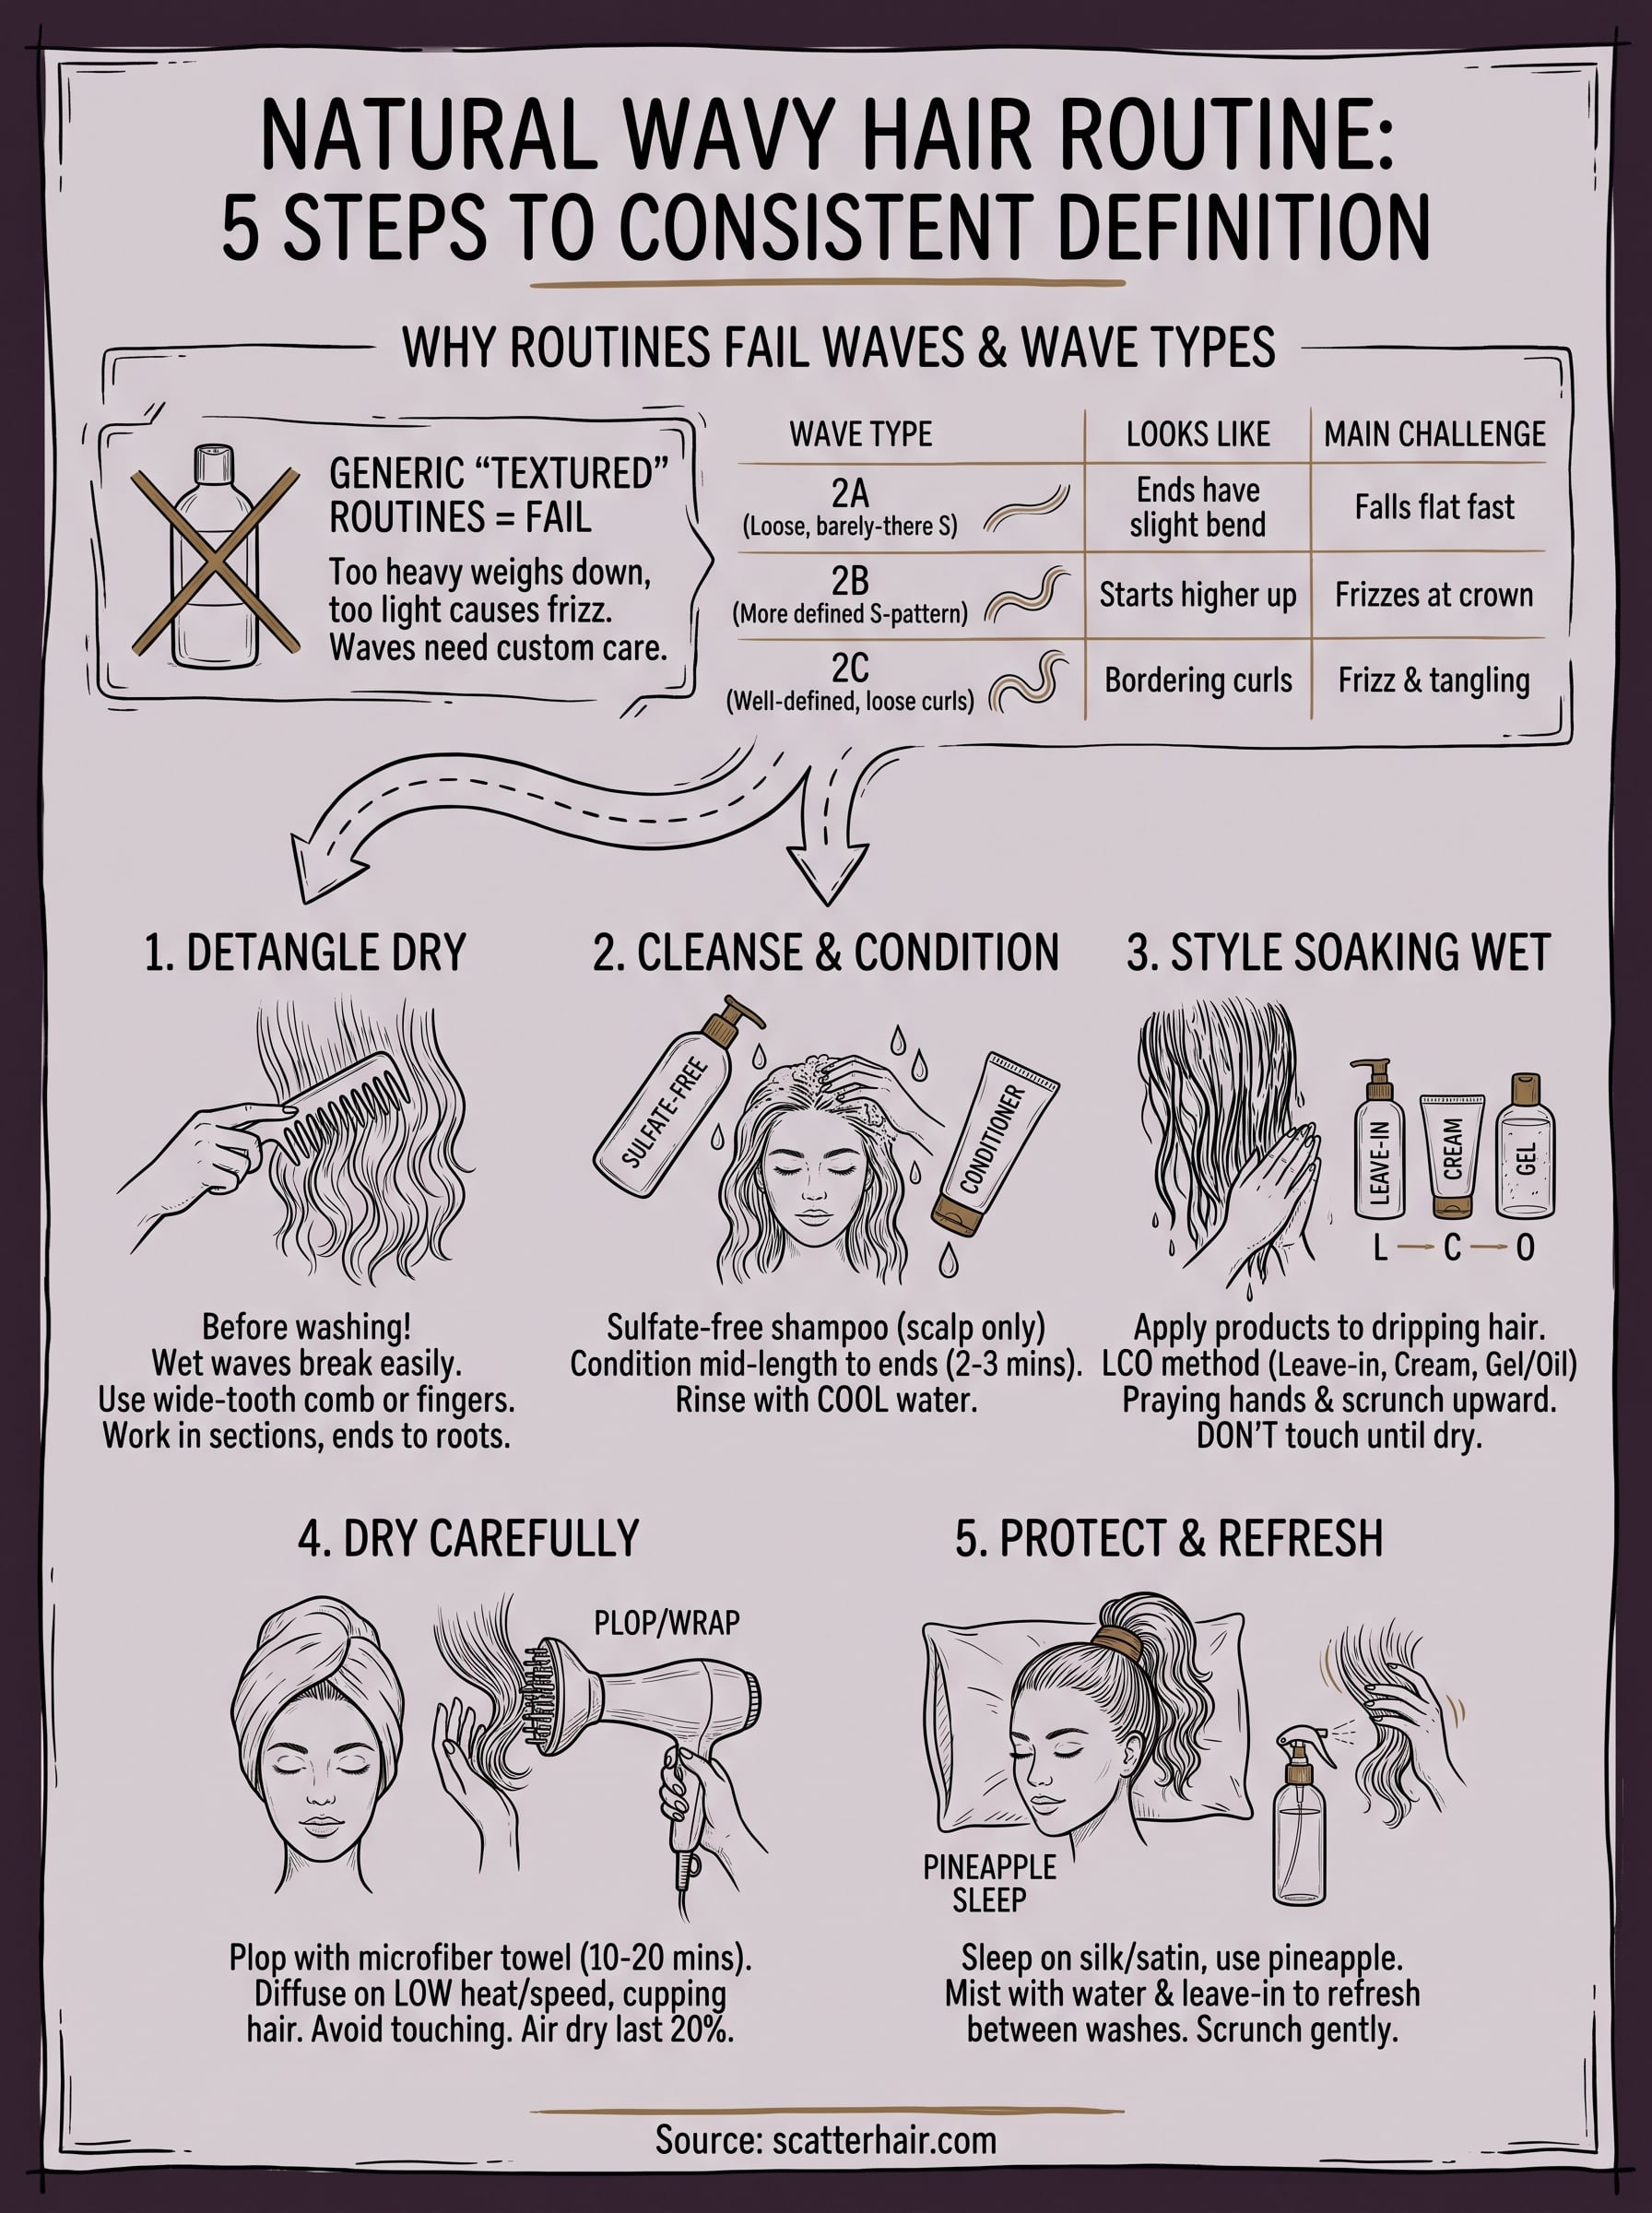
Making the routine stick
Your waves don't need a bigger product shelf. They need the same five steps in the same order, wash after wash, until your hands know the routine without thinking. Detangle dry, cleanse without stripping, style soaking wet, dry with patience, then protect what you built between washes. That sequence is the whole natural wavy hair routine, and consistency beats any single miracle product you could buy.
Give it three or four wash cycles before judging results. Waves take time to respond to a new pattern of care, and switching things up every few days just resets the clock. Once the routine feels automatic, you'll stop guessing and start expecting good hair days.
If you're still hunting for products that actually cooperate with textured hair instead of fighting it, see what we're building at Scatter before you buy anything else.