

How to Style Curly Hair After the Shower for Defined Curls
Your curls look great in the shower and fall apart the second you step out. That gap between wet, defined curls and dry, frizzy ones almost always comes down to what you do in the first five minutes after you turn off the water, not the products themselves. If you're searching for how to style curly hair after the shower, you're probably already dealing with frizz, shrinkage, or curls that dry into a shapeless puff no matter what you try.
The fix is a specific order of steps done while your hair is still soaking wet, before it starts air drying on its own terms. Product application timing matters as much as the products you choose, and skipping or reordering steps is usually why your results feel inconsistent from wash day to wash day.
This guide walks through the exact post-shower routine curly and coily hair needs, from the towel (or t-shirt) you use to blot excess water, to layering leave-ins and stylers correctly, to the drying method that locks in your curl pattern instead of loosening it. Follow it in order and you'll get defined curls that hold their shape all day, with a lot less frizz fighting you along the way.
Why your after-shower routine makes or breaks your curls
Curls form their shape while they're wet, not while they're dry. The hair cuticle is open and pliable right out of the shower, which means it's the only window where product can actually coat each strand and clump curls together instead of sitting on top of dry, closed hair. Wait too long, or let hair air dry halfway before you touch it, and you're styling hair that's already decided its own shape, usually a frizzy, undefined one.
The wet window closes fast
Give yourself roughly 5 to 10 minutes after you shut off the water before curls start drying on their own terms. Every extra minute you spend hunting for a towel or scrolling your phone is a minute your hair spends losing its curl pattern to gravity and evaporation. This is why pros call it the wet window: a short stretch where product goes on wet hair and locks moisture in before frizz has a chance to start.
Style your curls while they're still wet, or you're just decorating frizz.
What actually causes the frizz
Most frizz doesn't come from a bad product. It comes from timing and technique:
- Touching dry-ish hair with product instead of soaking wet hair
- Rough towel drying that roughs up the cuticle and triggers frizz
- Skipping detangling before product goes on, so clumps break apart later
- Disturbing curls while they're drying, which breaks the clumps you just formed
Get the order right and your curls do most of the work themselves. The next four steps walk through exactly how to time and layer everything so your curl pattern sets instead of falling apart.
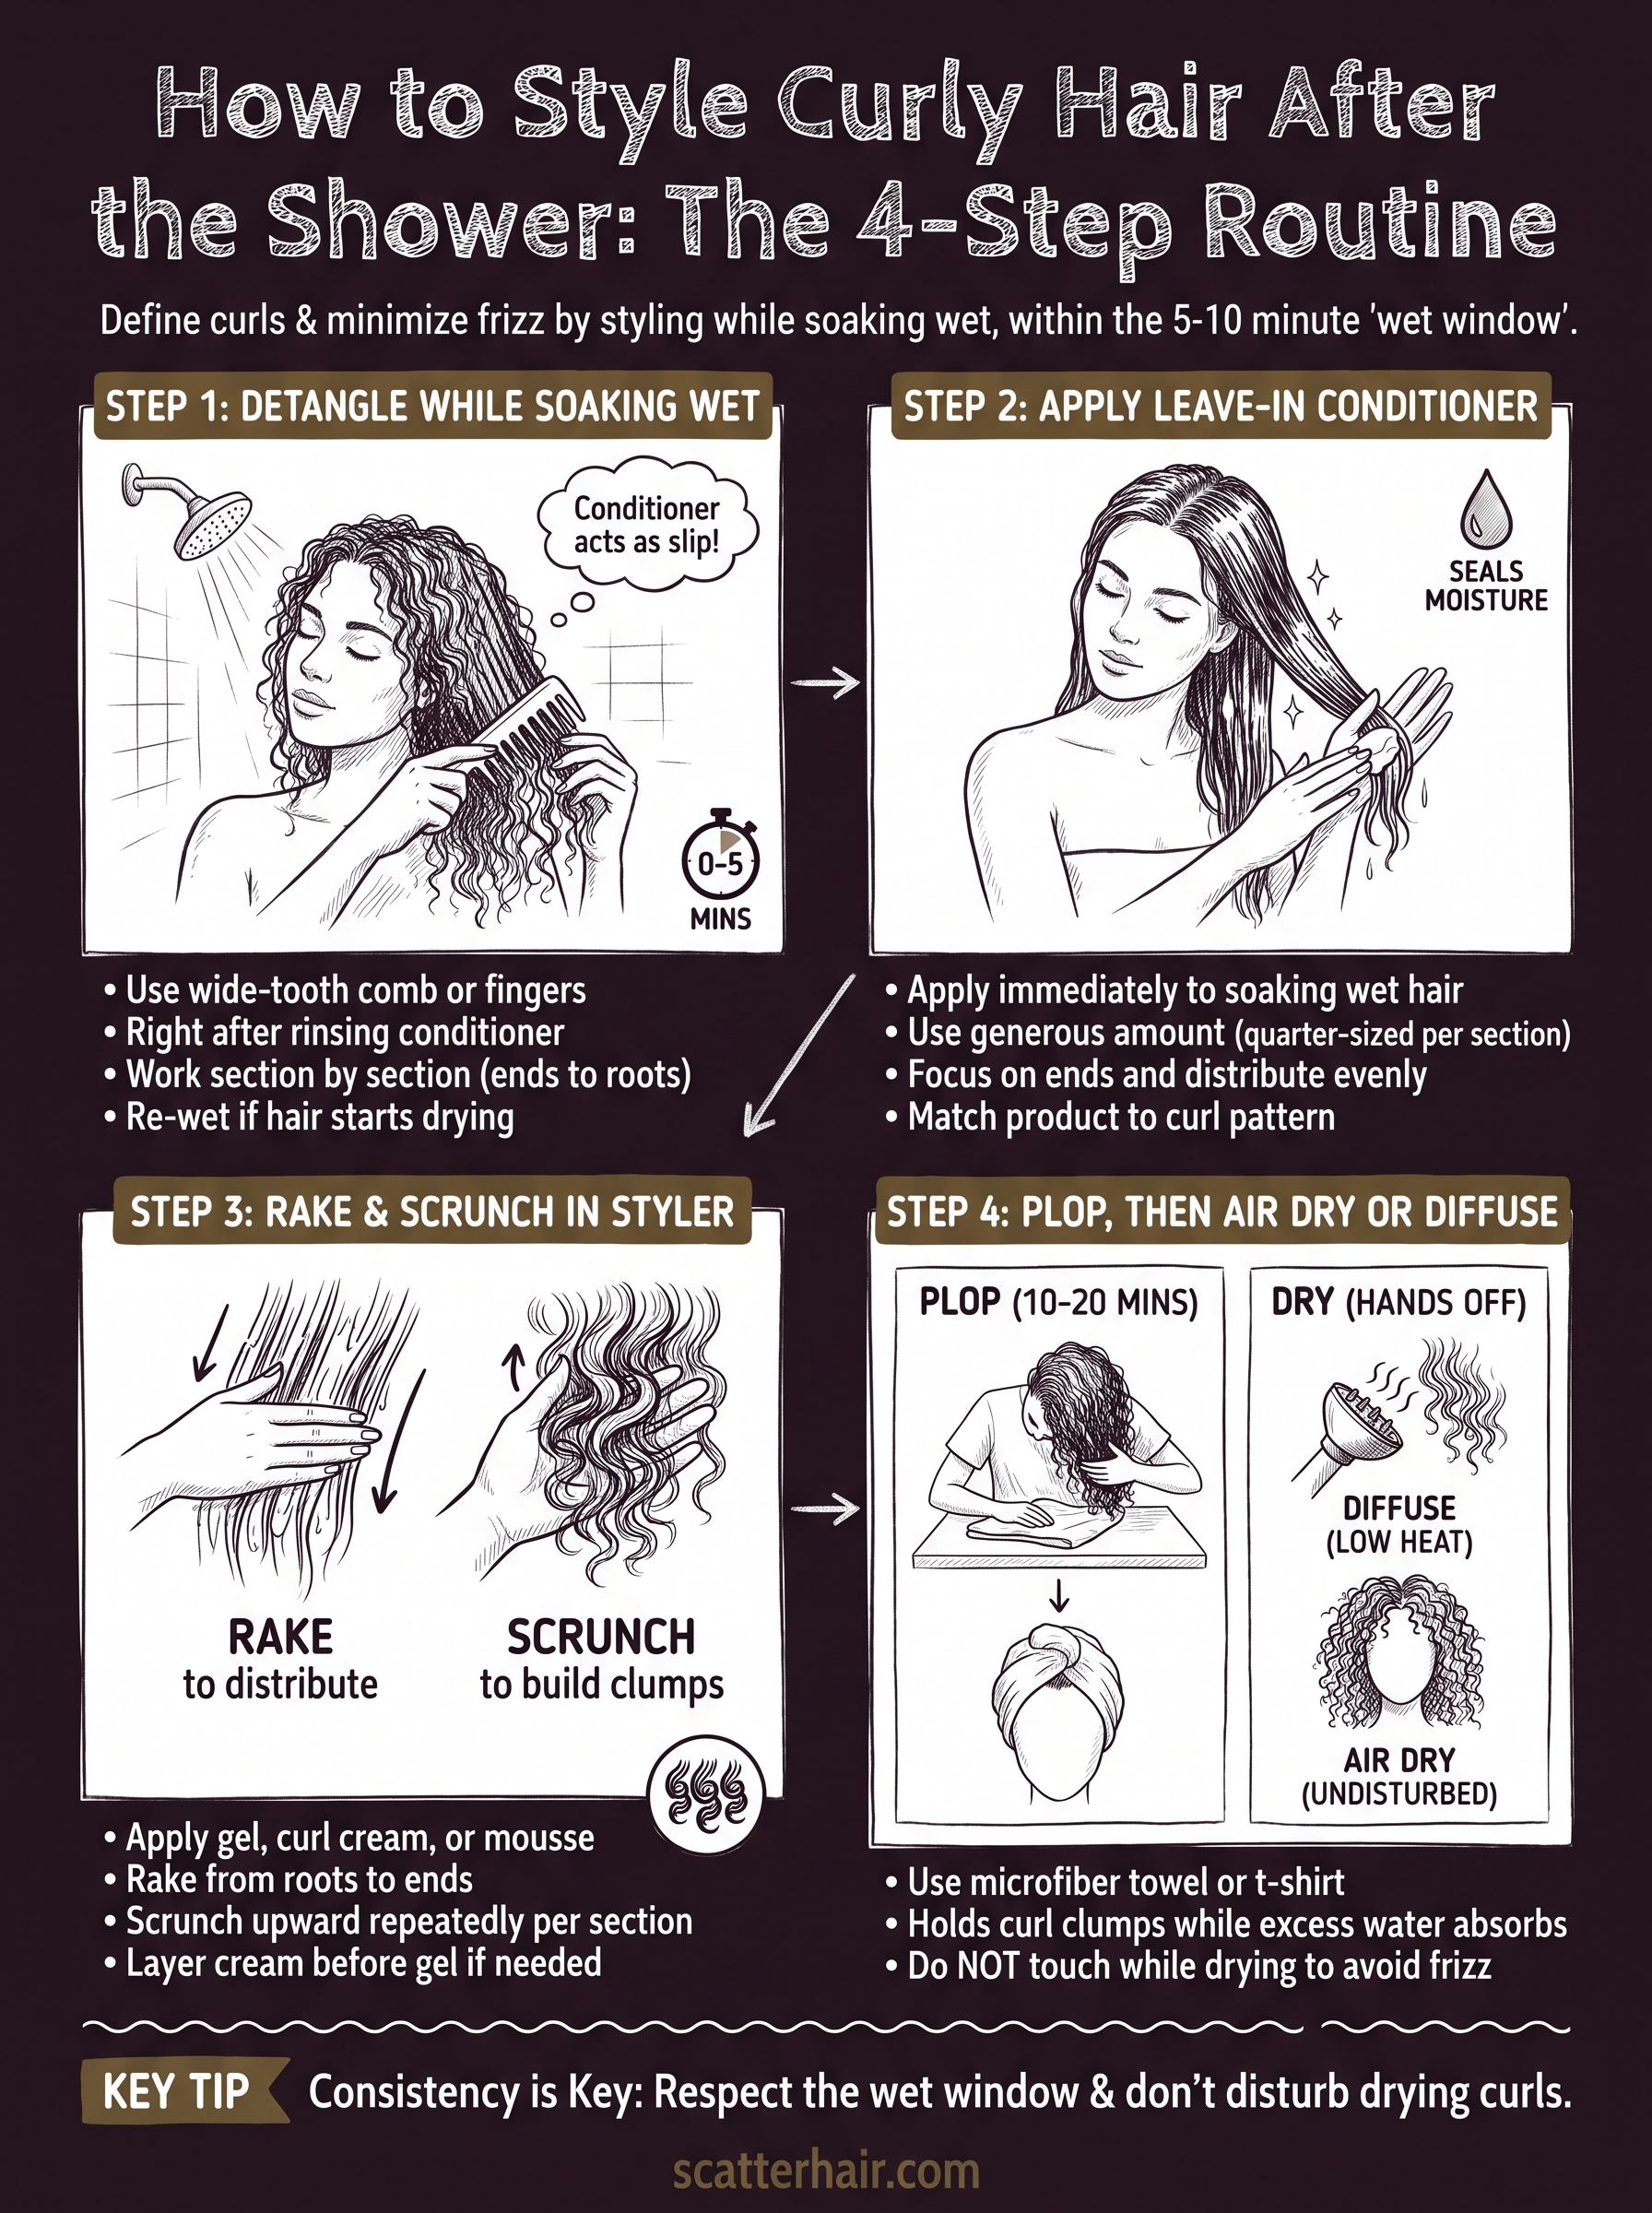
Step 1. Detangle while soaking wet
Grab a wide-tooth comb or your fingers and get to detangling before you even think about product. Do this step in the shower, right after you rinse out conditioner, while your hair is dripping and slick. Conditioner acts as slip, letting the comb glide through knots without tearing curls apart or stripping the clumps you'll need later.
Detangle in the shower, not after, because slip disappears the moment conditioner rinses away.
Work section by section
Don't attack your whole head at once. Split hair into four sections, clip what you're not working on, and comb from ends to roots in each one.
- Start at the very ends and work upward in small strokes
- Clear one section fully before moving to the next
- Re-wet any section that starts drying with a spray bottle
- Skip brushes entirely, they break curl clumps and create frizz
This sectioned detangling method keeps you from ripping through tangles blind, which matters more the curlier or coilier your texture is. Fingers work fine for looser waves, but tighter coils usually need a comb to get through knots without losing half your strands to breakage. Either way, finish detangling before you step out, because dry detangling undoes everything the wet window was supposed to give you.
Step 2. Apply leave-in conditioner
Once every section is detangled, apply your leave-in conditioner immediately, before you even step out of the shower if you can manage it. Wet hair absorbs product fastest right when the cuticle is open, so a leave-in applied now seals in moisture that a dry-hair application simply can't replicate. This single step is often the difference between curls that stay soft all day and curls that turn brittle by noon.
A leave-in on soaking wet hair does more work than three products layered on dry hair.
How much to use and where
Skip the small dab. Curly and coily hair needs a generous amount, roughly a quarter-sized dollop per section, worked in from ends to roots.
- Smooth the leave-in through one section at a time
- Focus extra product on the ends, since they're oldest and driest
- Flip your head upside down to distribute product evenly at the roots
- Move to the next section before hair starts air drying
Match the leave-in to your curl pattern
Looser waves do better with lightweight, water-based leave-ins that won't weigh curls down. Tighter coils usually need something richer, with shea or oils built in, to fight shrinkage and hold moisture through the day.
Step 3. Rake and scrunch in your styler
Now it's time for the product that actually builds your curl clumps: gel, curl cream, or a mousse if that's what your hair likes. Apply it the same way you applied your leave-in, section by section, while hair is still dripping. Raking and scrunching work together here, one distributes product evenly, the other packs your curls into tighter, more defined clumps.
Rake to spread the product, scrunch to build the clump, and never skip either step.
The technique, step by step
Work through each section with this sequence before moving to the next:
- Rake fingers through from roots to ends, spreading styler evenly
- Cup hair in your palm and scrunch upward toward the scalp
- Repeat scrunching 3 to 5 times per section until you feel clumps forming
- Move to the next section only once product is fully worked through
Layering without overloading
If you're combining a curl-defining gel with a cream, apply the cream first for moisture, then layer gel on top to seal and hold the clump together. Too much of either weighs curls down and leaves them greasy instead of defined, so stick to a dime to quarter-sized amount per section and adjust based on how your hair feels once it's dry.
Step 4. Plop, then air dry or diffuse
Once every section has product worked through, gather your hair on top of your head and wrap it in a microfiber towel or cotton t-shirt, a technique called plopping. This holds your curl clumps in place while gravity does its usual damage-control job, letting excess water absorb without disturbing the shape you just built.
How to plop correctly
Lay the towel or shirt flat, flip your head forward, and pile your curls into the center before twisting the ends up and securing them at your forehead.
- Lay the fabric flat on a counter or bed
- Flip forward and drop curls into the center
- Fold the back edge over your head
- Twist the sides and tuck them at the front
- Leave it on for 10 to 20 minutes, no longer
Plopping isn't optional if you want clumps instead of a frizzy halo by dry time.
Air dry or diffuse, but don't touch
After unwrapping, either let curls air dry undisturbed or diffuse on low heat with a diffuser attachment held underneath sections, never on top. Touching, scrunching, or separating curls while they're drying breaks the clumps you spent all this time building, so hands off until hair is fully dry.
Your curls, your routine
Getting defined curls after the shower isn't about buying more products, it's about respecting the wet window and working through the same four steps every wash day. Detangle wet, layer your leave-in and styler while hair is still dripping, plop to hold the clumps, then dry hands-off. Do that consistently and your curl pattern starts working with you instead of against you.
Your texture won't match anyone else's exactly, so expect some trial and error with product amounts and drying time before you land on what your hair actually wants. That's normal, and it's part of learning your own curls rather than chasing someone else's routine.
If you're still hunting for stylers built for textured hair that actually hold up through plopping and diffusing, scatterhair.com is worth a look before your next wash day.