

Twist Out For Curly Hair: Step-By-Step For Defined Length
A good twist out for curly hair can give you stretched, defined curls without heat damage, but getting it right takes more than just twisting and hoping for the best. The difference between a twist out that pops and one that falls flat usually comes down to technique, product choice, and timing.
This guide breaks down every step, from sectioning and twisting to the unraveling process that makes or break your results. You'll learn how to get consistent definition and length whether you're working with loose curls or tight coils. We also cover common mistakes that lead to frizz and shrinkage so you can avoid them entirely.
At scatterhair, we're building styling products specifically for textured hair, formulas designed to make styles like these actually hold up. Until our 2026 launch, consider this your go-to resource for nailing the twist out.
What a twist out does and who it works for
A twist out works by temporarily reshaping your curl pattern using moisture, product, and tension. You split your hair into sections, apply a styling product, twist each section from root to tip, allow it to dry completely, then unravel. The result is a stretched, defined curl pattern that shows more length than your natural shrinkage would otherwise allow. Understanding the mechanics behind this style helps you troubleshoot when results don't land the way you expected.
How the twist reshapes your curl pattern
When you twist two strands together, each strand wraps around the other and dries in that new shape. This is what produces the S-shaped or elongated coil pattern instead of the tight spring your hair naturally forms. The product you use holds that shape in place during and after drying. The longer you leave the twists intact while they dry, the more defined and long-lasting your final results will be.
The drying phase, not the twisting itself, is where definition actually forms. Unraveling too early is the most common reason twist outs fall flat.
Which hair types get the best results
A twist out for curly hair works across a wide range of textures, from loose waves to tight coils. Results look different depending on your curl pattern, but every type benefits from some version of this technique. Here's a breakdown of what to expect:
| Hair Type | What to Expect |
|---|---|
| Type 2 (wavy) | Loose, beachy waves with added definition |
| Type 3 (curly) | Stretched curls with a clear S-shape pattern |
| Type 4a/4b (coily) | Significant elongation with defined coil shape |
| Type 4c (tightly coiled) | Maximum length gain, softer but visible coil definition |
Your hair porosity and density also shape your results. High-porosity hair absorbs product quickly, which speeds up drying but can lead to crunchiness if you over-apply. Low-porosity hair needs lightweight formulas that actually penetrate the strand rather than coat it. Both types can nail this style once you dial in the right product amount and application method.
Prep your hair for definition and length
Preparation is what separates a defined twist out for curly hair from a dry, frizzy mess. Before you even think about sectioning, your hair needs to be in the right condition. Skipping prep or rushing through it means your product has less to work with, and your results will show it.
Start with clean, moisturized hair
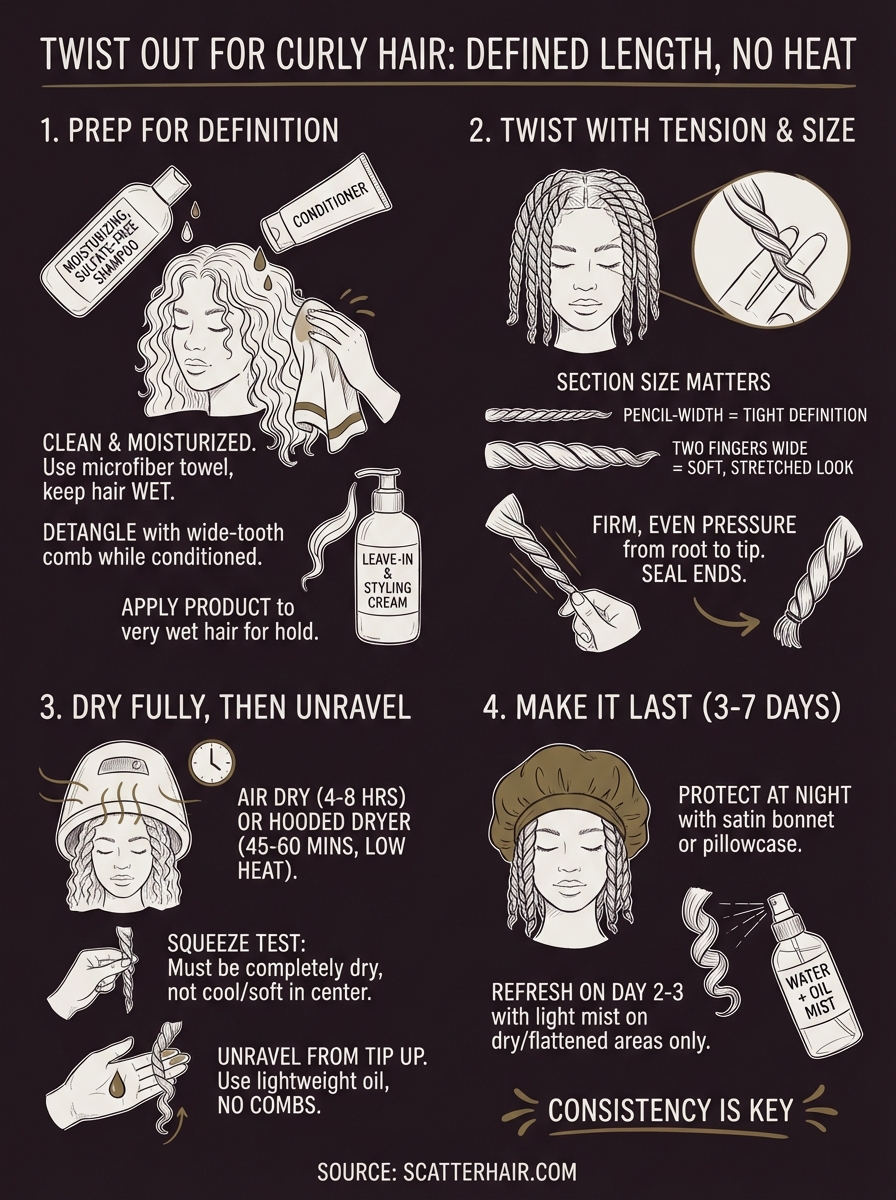
Wash your hair with a moisturizing, sulfate-free shampoo and follow with a conditioner that targets hydration, not just slip. Product buildup on the strand blocks your styling product from bonding to the hair shaft, which directly weakens your curl definition. After rinsing, do not towel-dry aggressively. Instead, use a microfiber towel or a cotton T-shirt to gently squeeze out excess water and leave your hair soaking wet, not damp.
Wet hair holds product more evenly than damp hair, which gives you better distribution and a more consistent curl pattern once you unravel.
Detangle before you twist
Work through each section with a wide-tooth comb or your fingers while your conditioner is still in. Tangles left in your hair create uneven tension during twisting, which breaks up your curl pattern and causes puffiness in specific spots. Once you rinse, do not let your hair air-dry to the point of dryness before applying your styling product.
Apply your leave-in conditioner and styling cream while your hair is still very wet. This locks in moisture at the strand level and gives your product the best chance of holding your twist shape through the entire drying process.
Twist with the right tension and section size
How you divide your hair and how firmly you twist each section directly controls how defined and elongated your final curl looks. Smaller sections produce tighter, more defined results. Larger sections give you a fuller, looser style. Matching your section size to your goal before you start saves you from inconsistent results across your head.
Getting section size right from the start is faster than trying to fix uneven definition after you unravel.
Section size determines your curl outcome
The size of each section in your twist out for curly hair changes everything about the finished look. Use sections roughly the width of your thumb for tighter definition and a more visible coil shape. Go wider, around two fingers wide, when you want volume and a softer, stretched result. Consistency across all sections matters as much as the size itself. Mixing large and small sections on the same head gives you an uneven, patchwork finish.
| Section Size | Result |
|---|---|
| Pencil-width | Very tight definition, maximum elongation |
| Thumb-width | Balanced definition and volume |
| Two fingers wide | Soft, full, stretched look |
How to twist for maximum definition
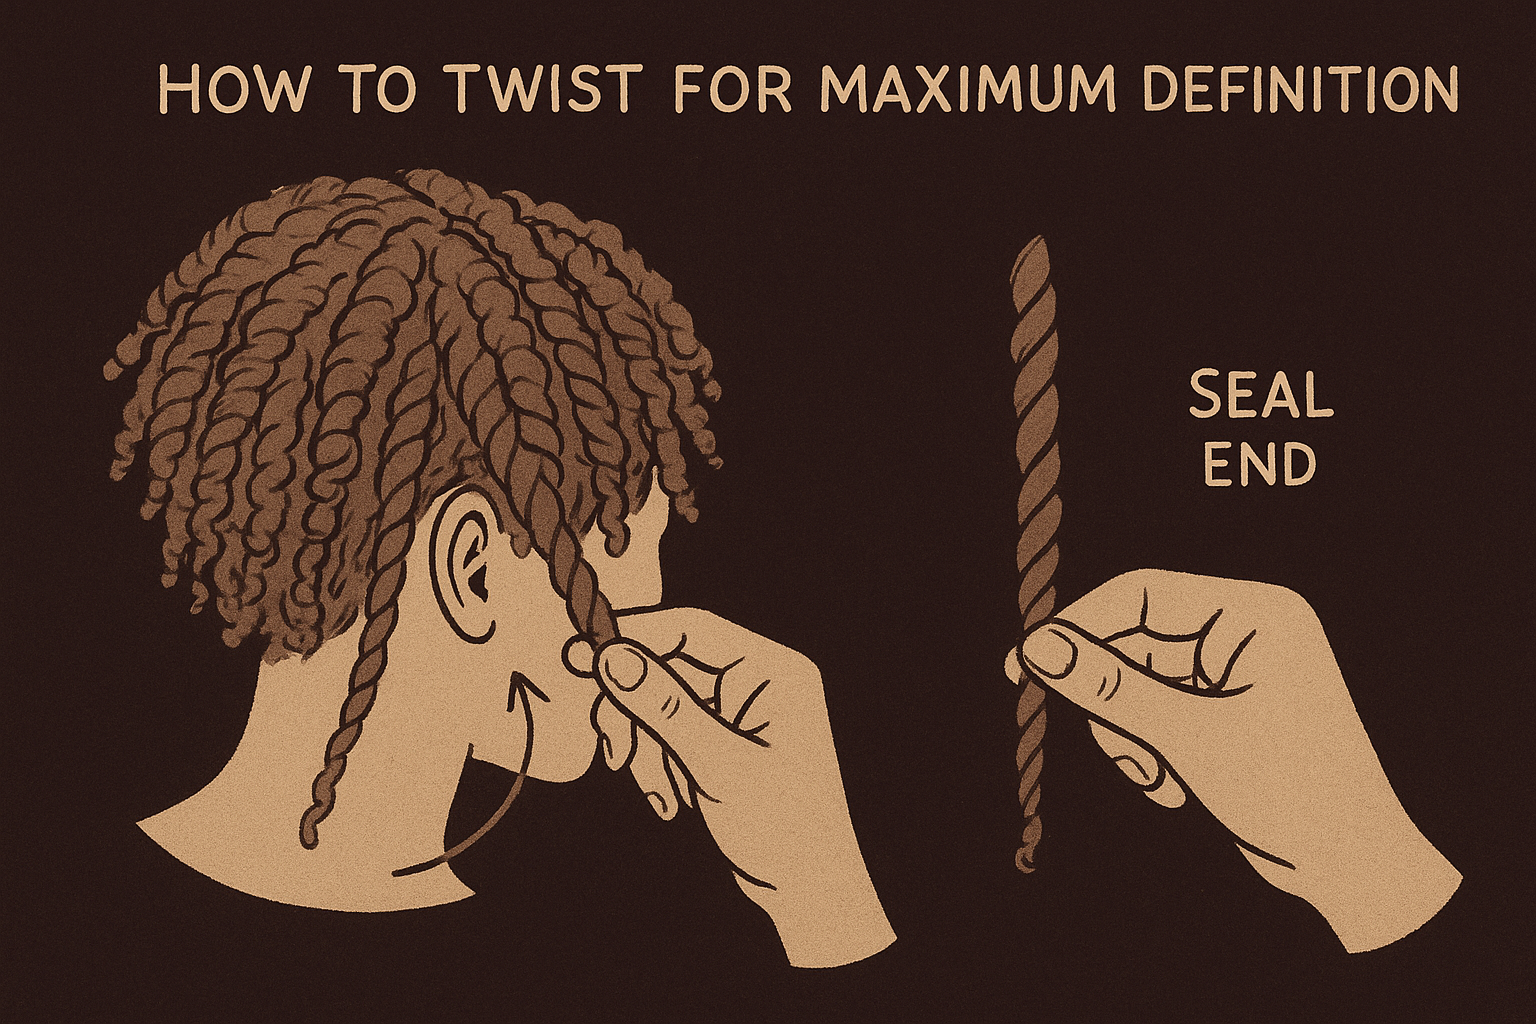
Start each twist at the root with firm, even pressure and keep that same tension all the way down to the tip. Loose tension at the root leads to puffiness and undefined roots after you unravel. Wrap each strand smoothly around the other without overlapping too tightly, which can cause the hair to mat together when dry. Seal each tip by rolling the ends between your fingers or coiling them around one finger so the twist stays intact through the entire drying process.
Dry fully, then unravel without frizz
The most overlooked step in any twist out for curly hair is waiting long enough. Your twists need to be completely dry before you touch them, not just surface-dry to the touch. Unraveling too early breaks the curl shape before it has fully set, and you end up with puffiness instead of definition. This step requires patience more than any special technique.
Know when your twists are actually dry
Air drying takes anywhere from 4 to 8 hours depending on your hair thickness and how much product you applied. A faster option is sitting under a hooded dryer on low heat for 45 to 60 minutes, which locks in definition without disrupting the twist shape. To check if your twists are ready, squeeze the thickest section near your roots. If it feels cool or slightly soft in the center, give it more time before moving on.
Rushing the dry time is the fastest way to undo all the work you put into sectioning and twisting.
Unravel without pulling apart your curl
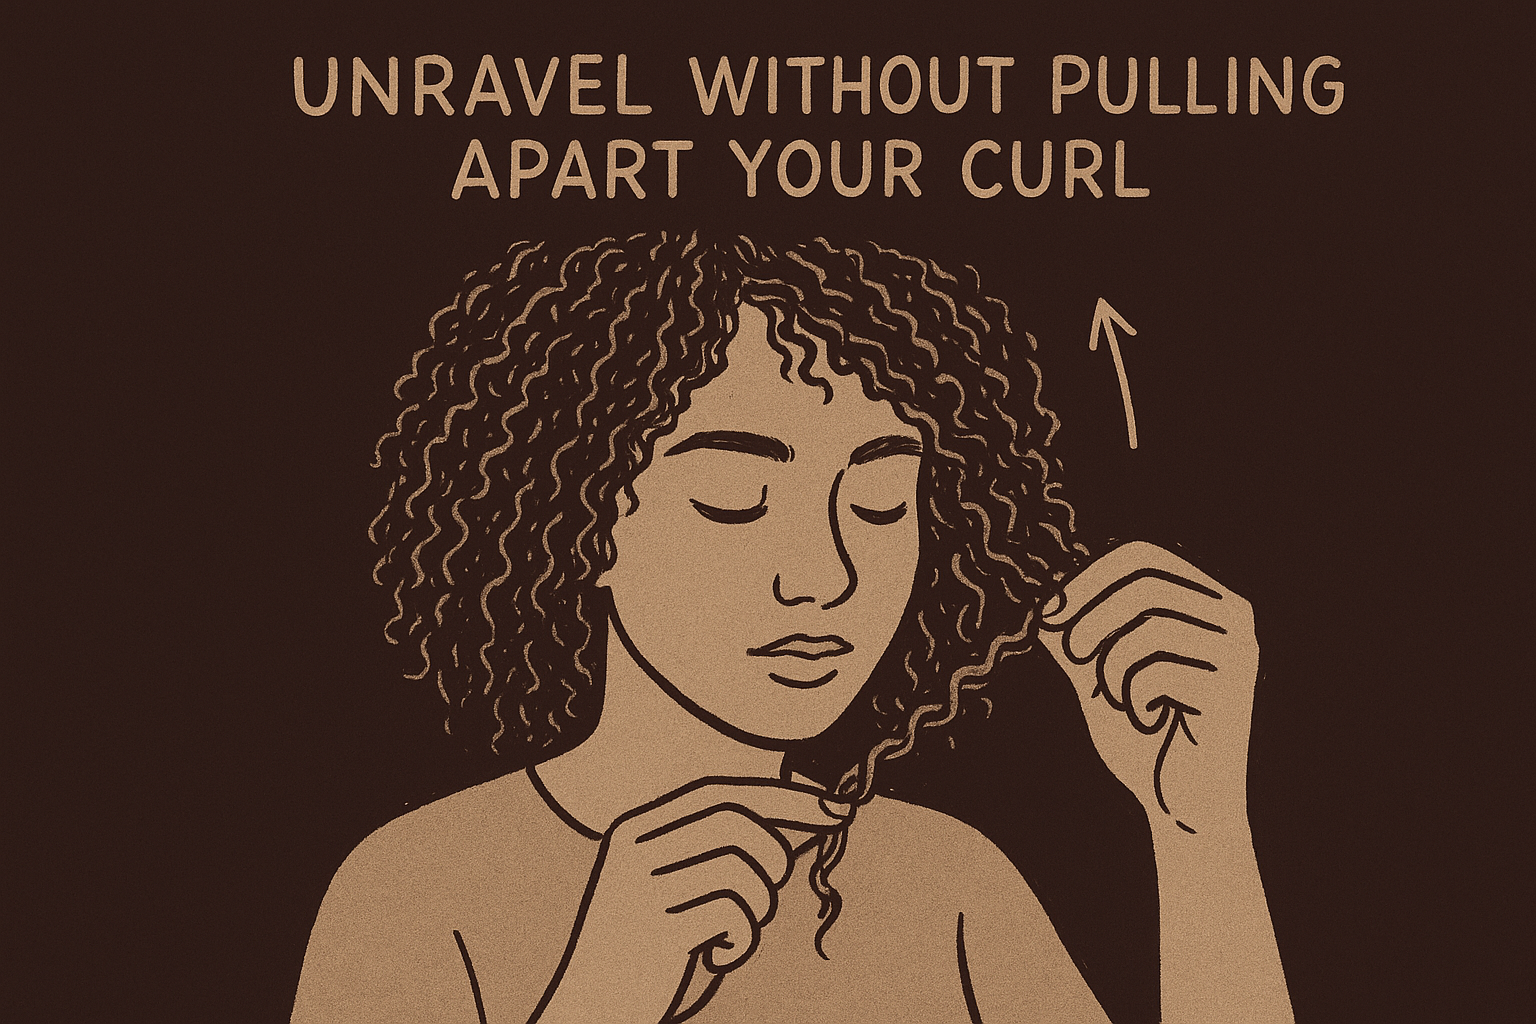
Start unraveling from the tip upward, not from the root down. Hold the base of each twist firmly with one hand to keep the root from frizzing as you separate the strands with the other. Once a twist is open, use a small drop of lightweight oil on your fingertips to gently stretch and separate the sections further. Avoid using a comb or brush at this stage entirely. Pulling sections apart too fast or too wide breaks the coil pattern and turns defined curls into a frizzy, undefined cloud.
Make it last 3 to 7 days
Your twist out for curly hair does not have to be a one-day style. With a few consistent habits, you can keep your definition intact and your hair looking intentional for nearly a week. The two biggest threats to longevity are friction and dryness, and both are easy to manage once you know what to address.
Protect the style at night
Sleeping without protection undoes your definition faster than anything else. Use a satin or silk bonnet to cover your hair every night, or switch to a satin pillowcase if a bonnet feels uncomfortable. Both options reduce friction between your hair and fabric so your coils stay intact through the night. For longer hair, loosely pineapple your hair on top of your head using a soft scrunchie before putting on the bonnet. This keeps your curls lifted and prevents them from being flattened by the weight of your head.
Consistent nightly protection extends your style by two to three days without any additional product.
Refresh and revive on day 2 or 3
When your curls start to lose their shape, a light refresh is usually all you need. Fill a small spray bottle with water and a few drops of a lightweight oil, then lightly mist the sections that need revival. Scrunch the product into those areas gently with your palm rather than pulling the hair apart. Focus the refresh on dry or flattened sections only and avoid soaking the entire style, which can reset shrinkage and collapse your definition prematurely.
Quick recap and next steps
A strong twist out for curly hair comes down to four things done right: prepped, moisturized hair before you start, consistent section sizes and root-to-tip tension during twisting, a full dry before you unravel, and nightly protection to keep your definition intact. Each step feeds into the next. Skipping prep kills your hold. Rushing the dry time collapses your curl pattern. Inconsistent unraveling introduces frizz that no refresh spray will fully fix.
Start with the basics on your next wash day. Use smaller sections if you want tighter definition, larger ones if you prefer volume, and stick to one size throughout. Once you unravel, protect your style every night and refresh with a water and oil mist only where your curls need it. The results get more consistent each time you run through the process.
For textured hair products built around performance, check out Scatter Hair and get early access before our 2026 launch.