

Flat Twist Out Tutorial: Beginner Steps for Big Definition
A flat twist out tutorial is one of the most searched-for techniques in natural hair styling, and for good reason. It gives you stretched, defined curls without heat, and it works on a wide range of textured hair types. But if you've ever unraveled your twists only to find frizz, lack of definition, or limp results, you know the technique matters just as much as the style itself.
The difference between a flat twist out that falls flat and one that turns heads usually comes down to a few key details: how you section, what products you use, and how long you let everything set. Once you nail those basics, the style becomes one of the most reliable looks in your rotation.
That's exactly the kind of effortless styling we're building toward at scatterhair, products custom formulated to make textured hair cooperate without a fight. We're launching in 2026, and until then, we're here to share the techniques that actually work. This guide breaks down every step of the flat twist out, from prep to unravel, so you can get big, consistent definition even if you've never twisted a single section before.
Flat twist out basics: what it is and what to expect
A flat twist out is a protective styling technique where you twist sections of your hair flat against your scalp, let them dry completely, and then unravel the twists to reveal stretched, defined curls. Unlike a standard two-strand twist out, flat twists lay against the scalp instead of standing freely, which creates a pattern that gives you more elongation and smoother root definition when you take it down.
What a flat twist actually is
The flat twist works by dividing a section of hair into two smaller pieces and wrapping them around each other while keeping both pieces flat against your scalp as you travel down the length. The motion is similar to a cornrow, but instead of adding new hair as you go, you work only with the section you started with. This creates a spiral pattern along the entire length of the strand that, when unraveled, translates into defined, uniform curl clusters.
The key difference between a flat twist and a regular twist is the "flat" part: keeping the twist against your scalp is what creates that elongated, smooth root look when you open it up.
Your fingers are doing two things at once: holding tension so the twist stays neat, and keeping the hair pressed against your scalp so it doesn't lift into a freestanding twist. Once your hands learn the rhythm, the technique moves quickly and you can work through a full head in a single session.
How flat twists differ from other twist styles
Two-strand twists are freestanding and create a rounder, more voluminous curl pattern when unraveled. Flat twists, by contrast, produce a more elongated wave pattern that reduces shrinkage significantly. If you've followed any flat twist out tutorial and compared the results to a two-strand twist out side by side, the flat version gives you more length and root smoothness while the two-strand gives you more volume and bounce near the roots.
Bantu knots produce a tighter, more uniform spiral. Braid outs create a flatter, more stretched wave. Flat twists sit in the middle: enough definition to look intentional, enough stretch to show off your actual hair length, and enough texture to keep that natural hair character intact.
What to realistically expect from your results
Your results depend on a few variables: your curl pattern, the products you use, how long you let your twists dry, and how carefully you take them down. On tighter curl patterns like 4a, 4b, and 4c, you'll get more defined, springy clusters. On looser patterns like 3b and 3c, the result will be wavier and more flowing overall.
Shrinkage is still part of the picture, but a flat twist out will show noticeably more length than most wash-and-go styles on the same hair. Expect some frizz around days two and three, but that's manageable with a good refresh routine. The style typically lasts three to seven days depending on your hair type and how consistently you protect it at night.
Prereqs: hair prep, tools, and products to use
Before you follow any flat twist out tutorial step by step, getting your setup right saves you time and prevents frustrating results later. Your hair needs to be in a specific state before you twist: clean, detangled, and damp rather than soaking wet or bone dry. Twisting on wet hair extends drying time and invites frizz. Twisting on dry hair makes the twists harder to maintain and cuts definition. Damp is the sweet spot.
Tools you need before you start
Having the right tools on hand means you won't stop mid-session to search for something. A rat-tail comb handles clean parting, which directly affects how even your sections look once you unravel. A spray bottle filled with water lets you re-dampen any section that starts to dry while you're still working through the rest of your head.
Here's what to gather before you sit down:
- Rat-tail comb (for clean parts and sections)
- Wide-tooth comb or detangling brush
- Spray bottle with water
- Duckbill clips or hair clips (to hold sections out of the way)
- Satin or microfiber towel (to blot, not rub, your hair dry after washing)
- Small hair ties or bands for the ends
The quality of your parts determines the quality of your final look. Uneven sections produce uneven curl clusters, so your comb matters more than most people expect.
Products that actually work for flat twists
Your product selection controls how long your style holds and how much definition you get when you unravel. The general rule is to layer from lightest to heaviest: a leave-in conditioner first for moisture, then a curl cream or twisting butter for hold and slip, then a light oil to seal everything in.
A few product guidelines to keep in mind:
- Avoid heavy butters as your only product; they weigh textured hair down without providing enough hold
- Choose a curl cream with medium hold rather than stiff gel if you want a soft, touchable result
- Use just enough product to coat each section without making the hair feel sticky or greasy
- Apply oil last, not first, so it seals moisture in rather than blocking it out
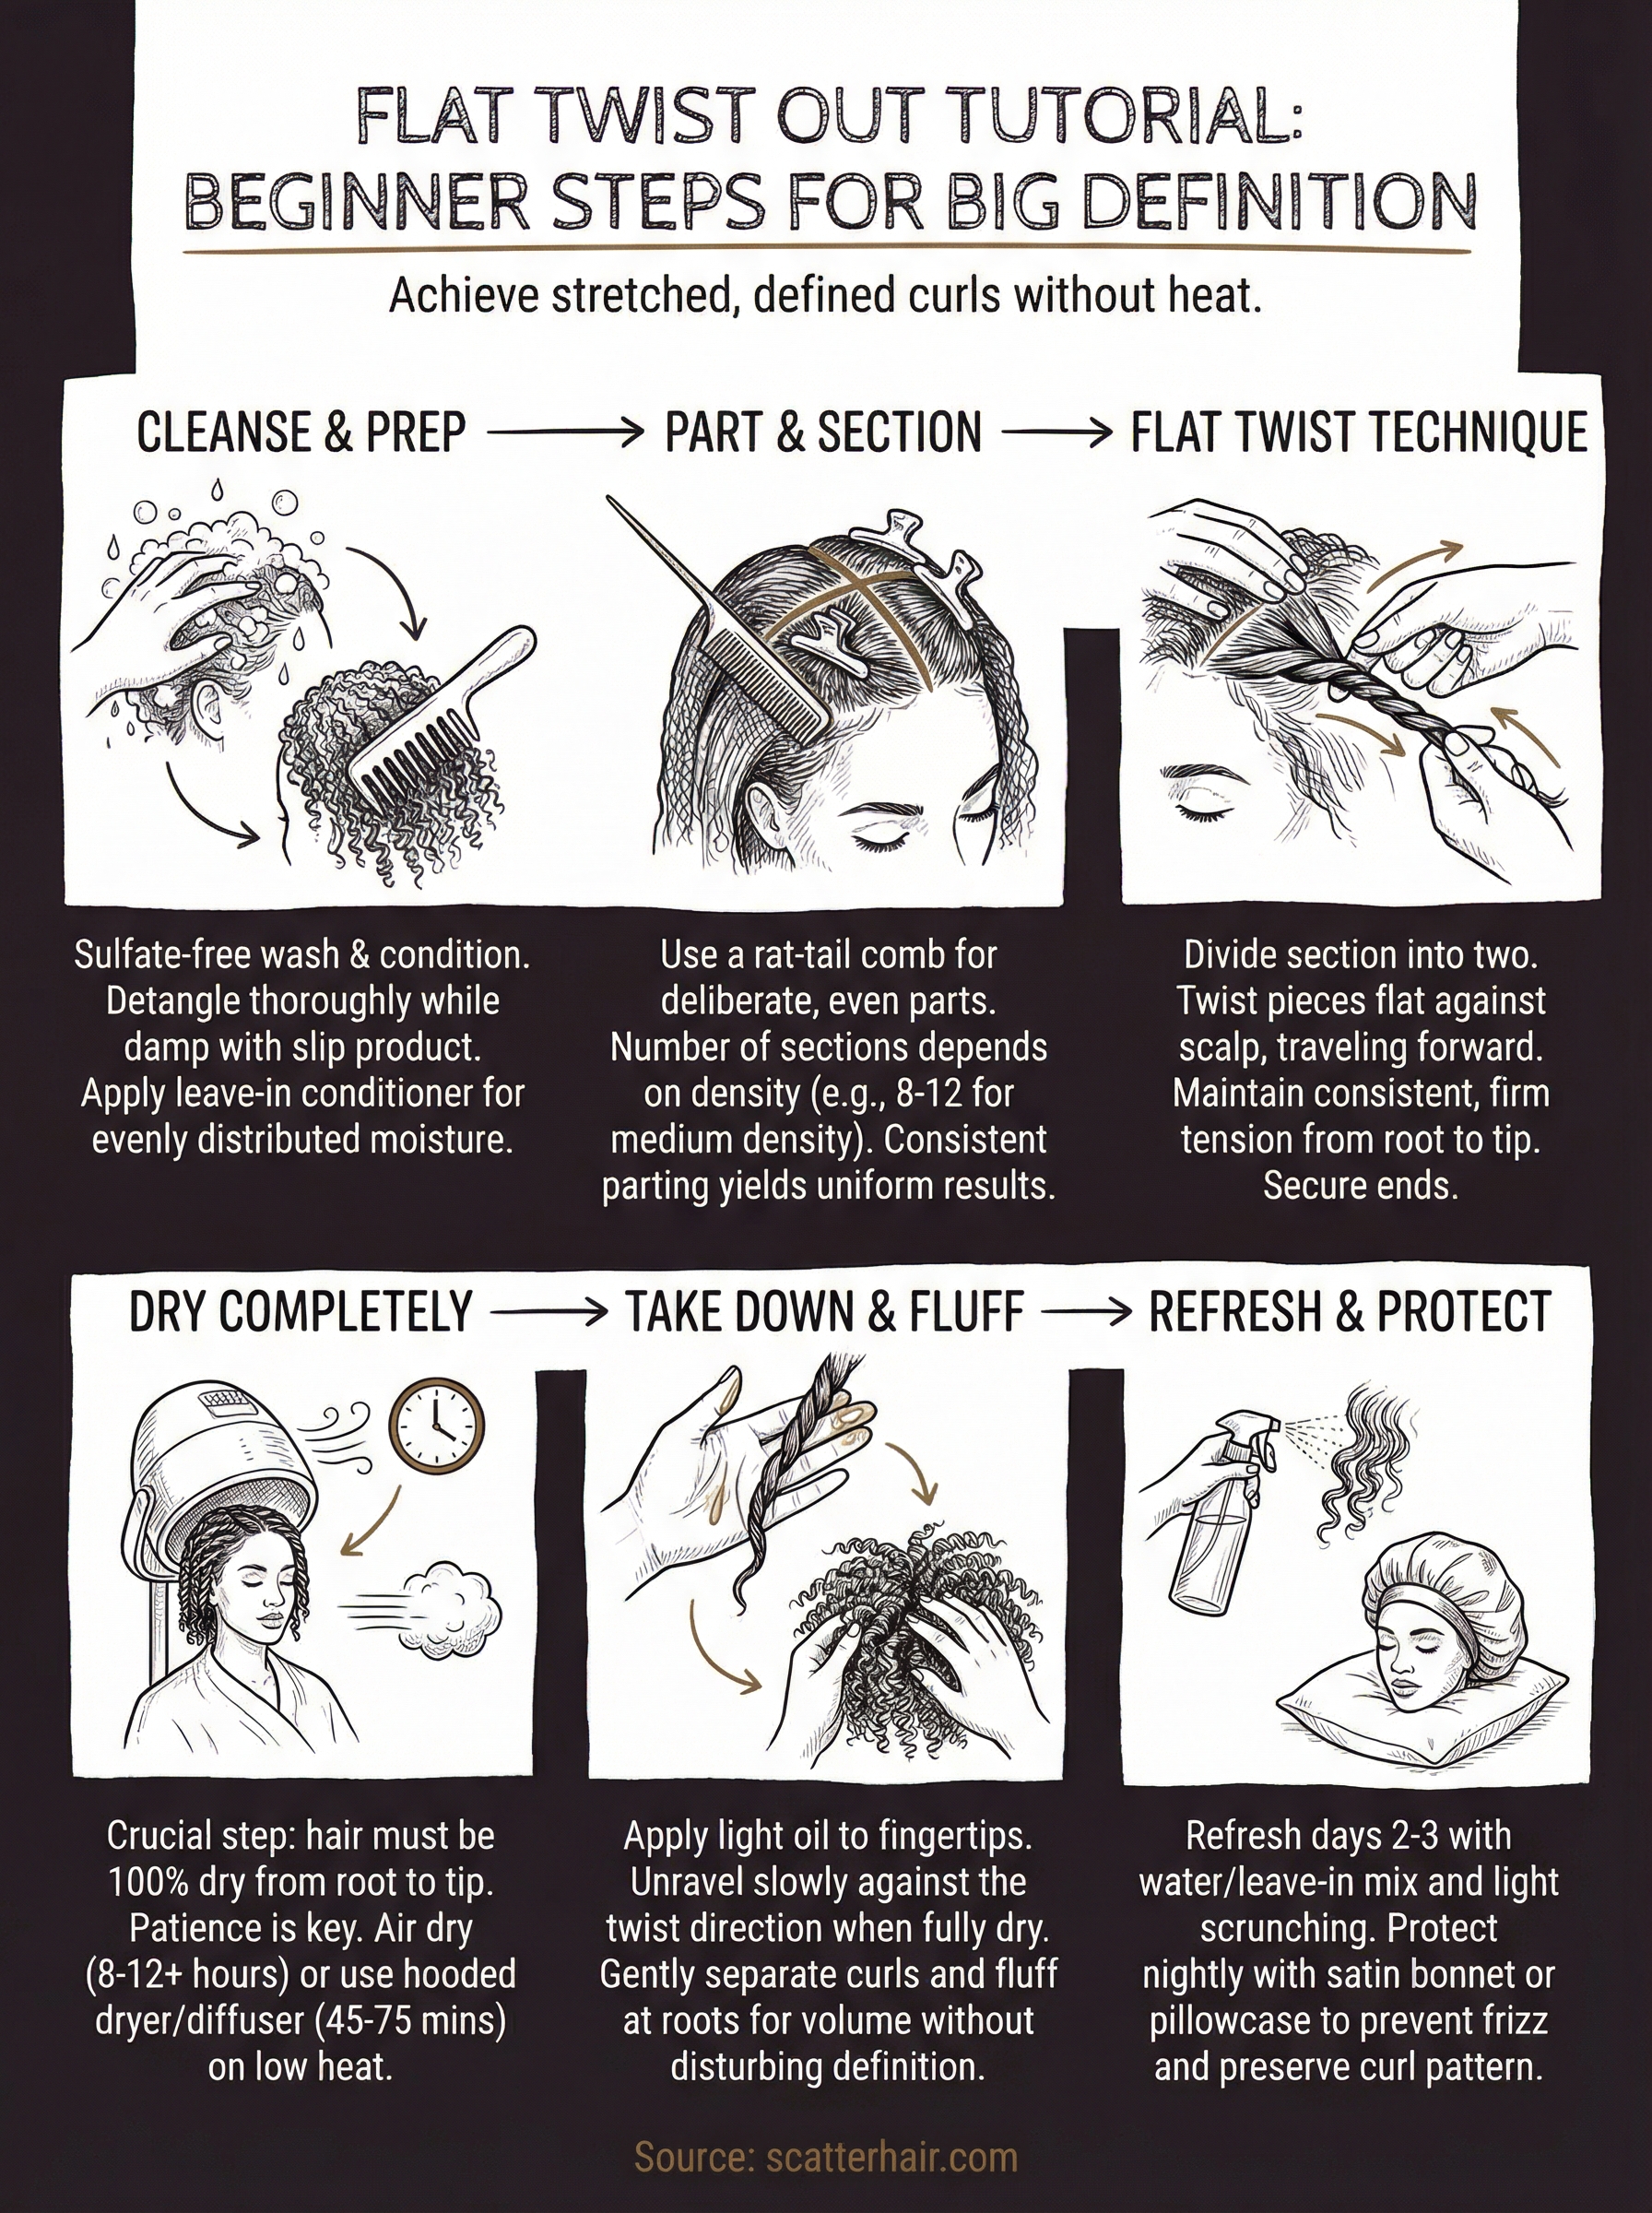
Step 1. Cleanse, detangle, and moisturize for a smooth set
Clean hair holds a flat twist out better than hair carrying days of old product and buildup. Product residue and excess oils prevent your new styling products from bonding with your strands, which directly weakens curl definition after unraveling. Start this step on wash day so your hair is fresh and ready to absorb everything you apply in the steps that follow.
Cleanse without stripping your moisture
Use a sulfate-free shampoo or a co-wash to remove buildup while keeping your hair's natural oils intact. Sulfate shampoos clean aggressively, but they strip moisture faster than textured hair can recover, leaving you with dry strands that resist definition. Work the cleanser into your scalp using small circular motions with your fingertips, then let the product rinse down the length of your hair without scrubbing the ends directly.
Rinse with cool water at the end of your wash to help close the cuticle and create a smoother surface for your styling products to sit on.
Follow up with a rinse-out conditioner and let it sit for three to five minutes before rinsing fully. This step restores softness and makes the detangling phase significantly faster and less damaging.
Detangle in sections before you style
Trying to work through a full head of tangled hair at once creates knots within knots. Divide your hair into four loose sections and clip three out of the way while you focus on one at a time. Use a wide-tooth comb or a detangling brush and start at the ends of each section, moving upward toward the roots slowly to prevent breakage.
Apply a slip-providing product like your rinse-out conditioner or a diluted detangling spray to each section before combing. This reduces friction and keeps the hair from re-tangling while your hands are still working through it.
Moisturize while the hair is still damp
Once detangled, apply your leave-in conditioner to each section immediately while the hair is still damp. Damp hair absorbs leave-in more evenly than dry hair, giving you better moisture distribution across every strand. Work the product through each section from root to tip with your fingers before moving on to the next step.
Step 2. Part and section for even curls and less frizz
How you divide your hair before twisting controls the consistency of your results more than most people expect. Uneven sections produce uneven curl clusters, and sections that are too large can create frizz because the twist won't hold the hair flat against your scalp as reliably. Taking five extra minutes to part your hair deliberately at this stage pays off significantly when you unravel.
How many sections to work with
The number of sections you use depends on your hair's thickness and density. Working with too few large sections makes it hard to keep each twist neat and flat against your scalp. Too many tiny sections create a result that looks busy and loses the open, flowing definition that makes a flat twist out worth doing in the first place.
A practical starting framework looks like this:
| Hair Type | Recommended Number of Flat Twists |
|---|---|
| Fine or low-density | 6 to 8 twists |
| Medium density | 8 to 12 twists |
| Thick or high-density | 12 to 16 twists |
Fewer, larger twists give you bigger, looser curl clusters when you unravel. More, smaller twists give you tighter, more defined coils.
Start with fewer sections on your first attempt so you can focus on learning the technique without rushing through too many twists in one session.
How to create clean, even parts
Use your rat-tail comb to draw each part with intention rather than eyeballing it. Clip each completed section out of the way with a duckbill clip before moving to the next one so your hair doesn't mix back together mid-session. Working in a consistent pattern, such as starting at the nape of your neck and moving toward your crown, keeps your sections organized and your twist placement predictable.
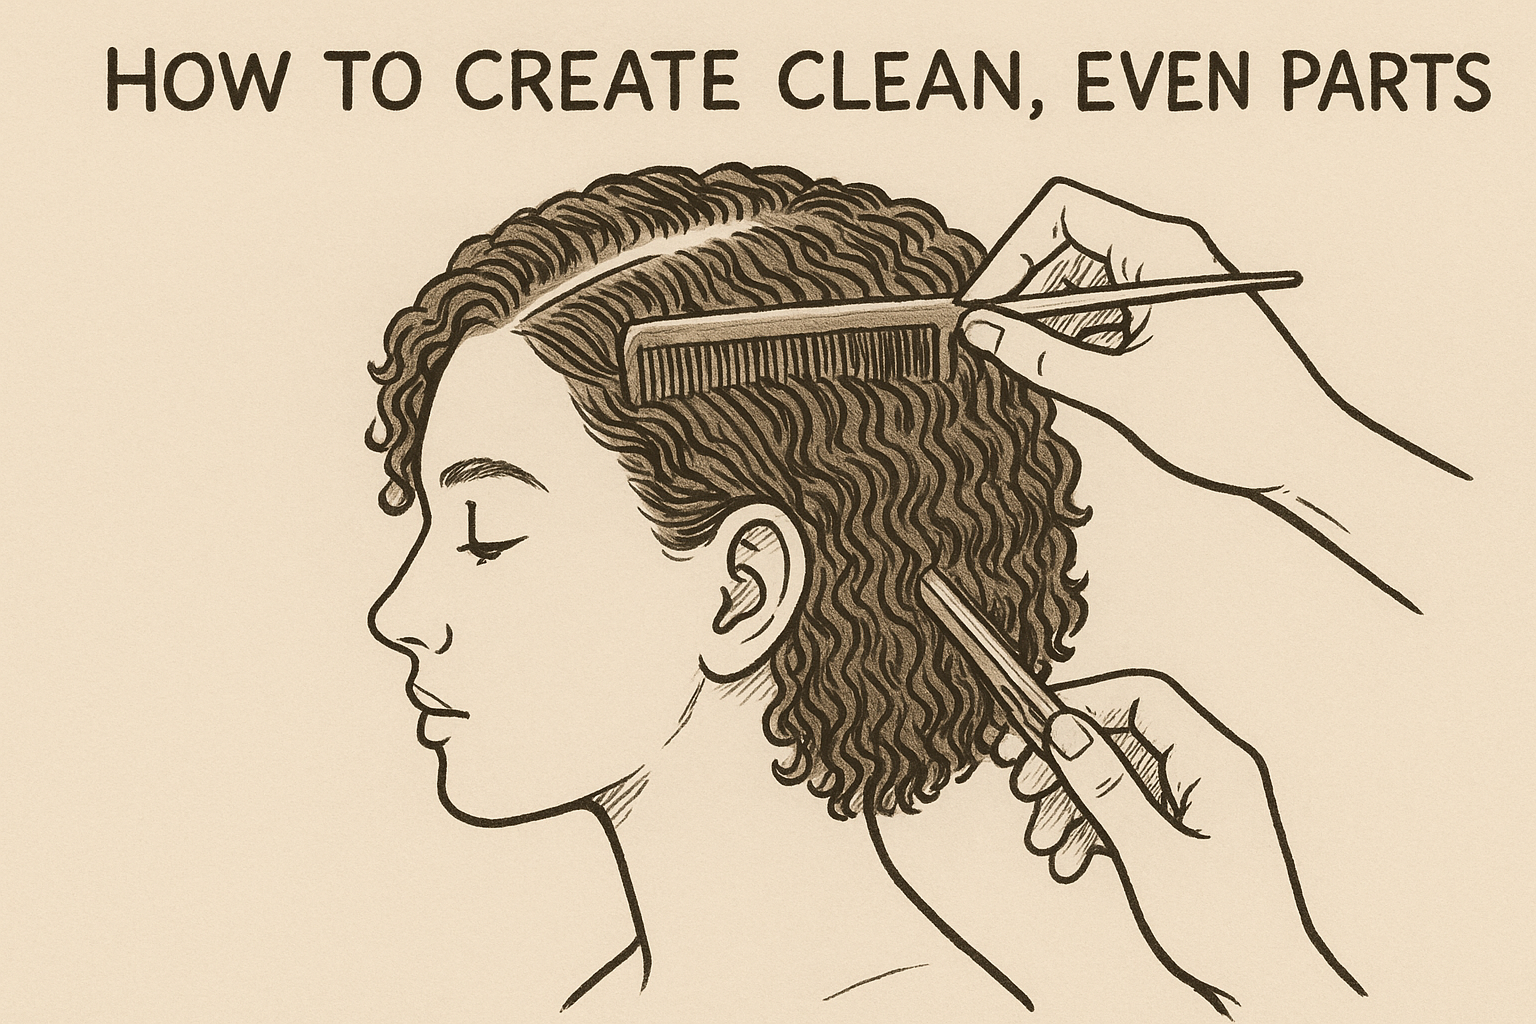
Many flat twist out tutorial guides overlook this detail, but the direction of your parts also shapes your final look. Parts that run straight back give you a sleeker root area, while parts that run diagonally from front to back create a more natural-looking flow once you open the style up.
Step 3. Flat twist technique that stays tight and neat
The actual twisting motion is where most people lose definition and neatness before they even get to the unravel. Keeping each section flat against your scalp while maintaining consistent tension throughout the twist is what separates clean, defined results from a style that looks messy before you open it. Follow this step closely on your first attempt, and the motion will feel natural quickly.
How to start each twist at the root
Starting correctly at the root sets up every inch of the twist that follows. Divide your section into two equal pieces and hold one in each hand with your index fingers and thumbs. Press both pieces flat against your scalp before you make your first cross, because lifting the hair even slightly at this stage creates a bump at the root that won't smooth out when you unravel.
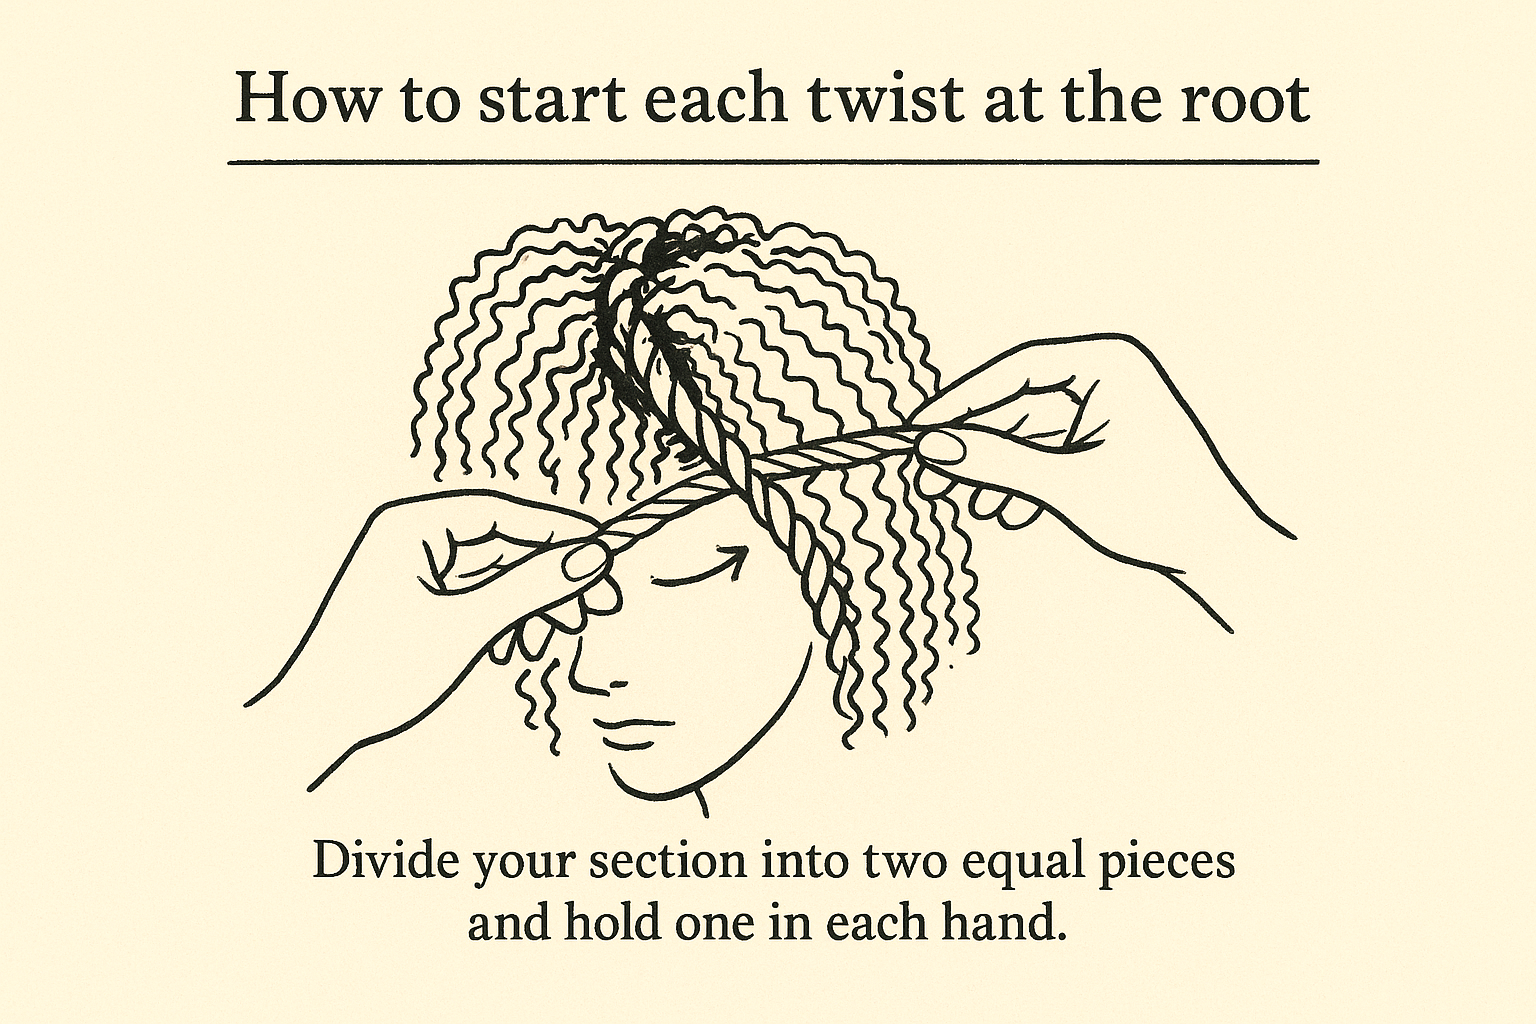
The motion works like this: cross the left piece over the right, then rotate both pieces together a half turn so the left piece is now underneath. Cross the new left piece over the new right again. Repeat this pattern while keeping your fingers pressed close to your scalp. Your hands should travel forward along the section, not upward away from it.
Keep tension consistent as you work down the length
Tension is the variable that most flat twist out tutorial guides underexplain, and it matters from the first cross all the way to the tips. Too little tension lets the twist loosen before it dries, which produces frizz and a weak curl pattern when you take it down. Too much tension can cause breakage at the root, especially on more fragile textured strands.
Mist any section lightly with your spray bottle if it starts to dry while you're still working. Damp hair holds the twist significantly better than dry hair does.
The right amount of tension feels like a firm but comfortable pull at the scalp. Re-misting keeps your product activated and the hair pliable so your twist stays smooth all the way to the ends. Finish each completed twist by wrapping the end around itself or securing it with a small hair band to prevent unraveling before the full set is dry.
Step 4. Dry and set your twists so the curl holds
How long you let your twists dry is the single variable most people rush, and it's the one that matters most for lasting definition. Unraveling twists that aren't fully dry is the fastest way to turn a well-executed set into a frizzy, undefined result. Your curls need time to form around the twist pattern and hold that shape before you open them up. This step requires less effort than any other part of the process, but it demands your patience.
Let your twists dry completely before touching them
Patience at this stage protects everything you did in the previous steps. Your hair needs to be completely dry from root to tip, not just dry on the surface. Pressing your finger against a twist and feeling any coolness or dampness means it needs more time. A common mistake in any flat twist out tutorial is jumping to the take-down too early because the outside of the twist feels dry while the inside is still damp, and your results suffer significantly for it.
Rushing the dry time is the single most common reason a flat twist out loses definition within hours of unraveling.
Check drying time estimates based on your method:
| Drying Method | Estimated Time |
|---|---|
| Air drying at room temperature | 8 to 12 hours |
| Sitting under a hooded dryer | 45 to 75 minutes |
| Diffusing on low heat | 30 to 50 minutes |
How to speed up drying without damaging your curl pattern
A hooded dryer or a diffuser attachment on a blow dryer gives you more control over drying time without disturbing the twist structure. If you use a diffuser, keep the heat on low or medium and hold it underneath each section without pressing it directly against the twist. Pressing the diffuser into the hair disrupts the shape you spent time building.
Air drying works well if you have the time, but it requires good airflow around your twists rather than having your hair pressed against a pillow or a chair. Sitting upright or keeping your twists loosely away from your neck while you air dry helps the set form evenly across every section rather than flattening on one side.
Step 5. Take down, separate, and fluff without losing definition
The take-down phase is where most of the damage happens to an otherwise well-executed set. How you open each twist and how you handle the hair immediately after determines whether you walk away with a clean, defined style or a frizzy cloud. Your hands are your tools here, and using them correctly makes the difference between results you want to repeat and results you want to redo.
How to open each twist without creating frizz
Start the take-down only when your twists are fully dry from root to tip. Add a small amount of oil to your fingertips before you touch a single twist, because dry hands create friction against the hair and friction creates frizz on contact. Apply just enough to coat your fingertips lightly without making them greasy.
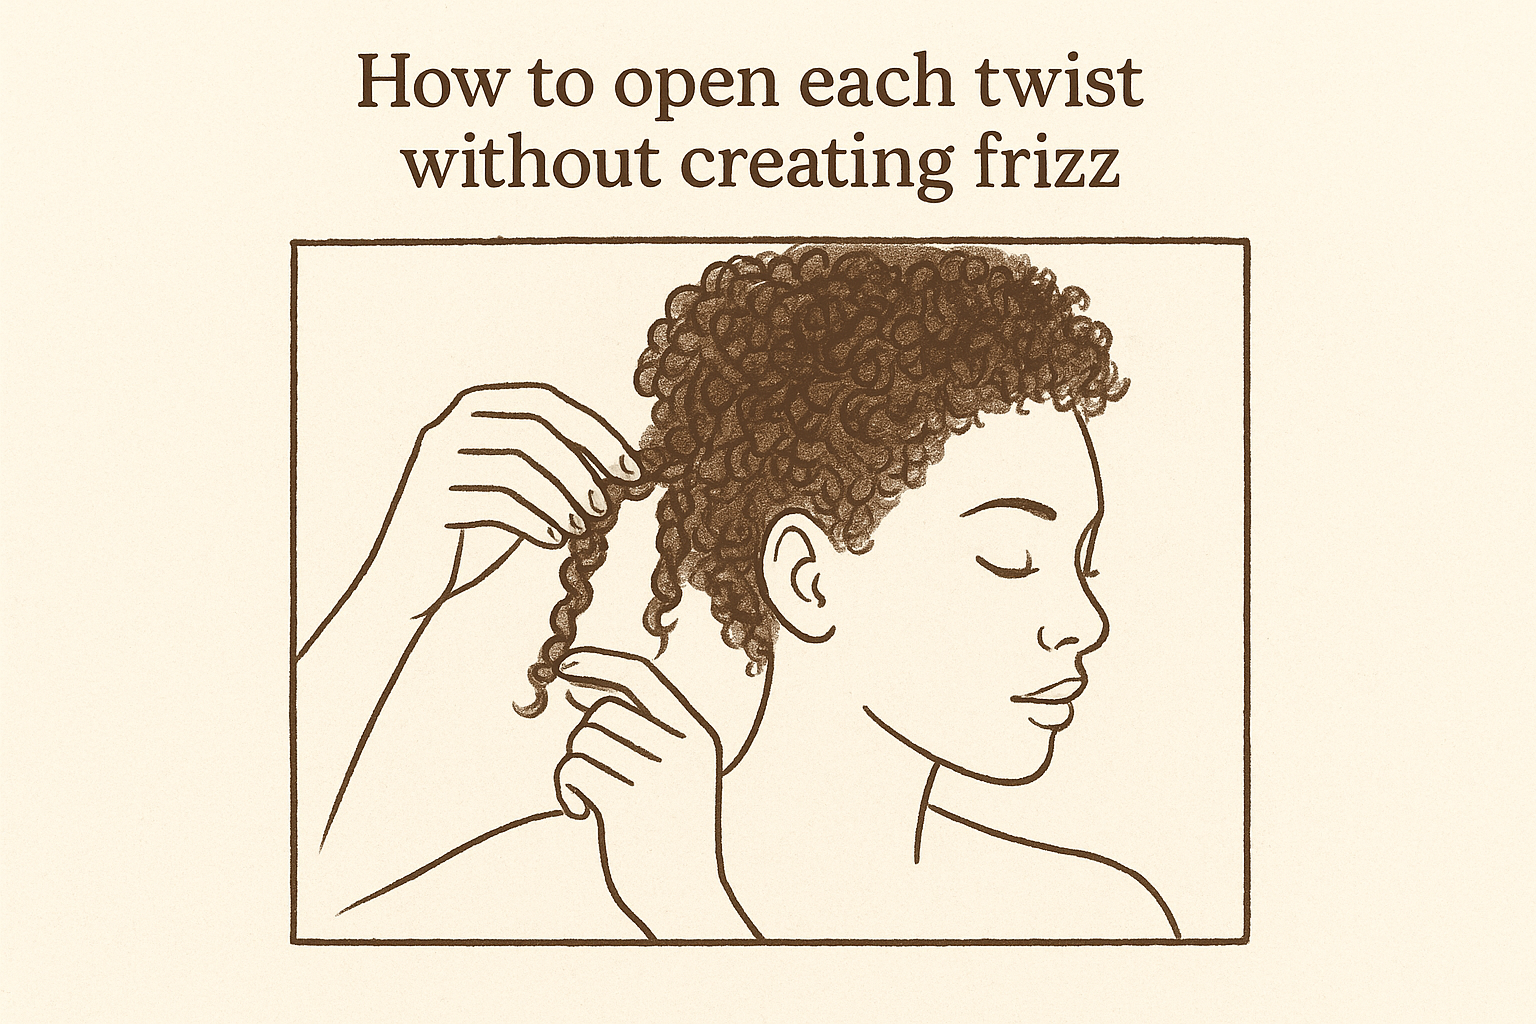
The direction you unravel matters: always open each twist in the opposite direction of the way you twisted it, or you'll disrupt the curl pattern before it has a chance to open fully.
Unravel each twist slowly and downward, following the spiral rather than pulling against it. Work from the end of the twist upward toward the root so the curl releases in the correct direction. Pulling from the root down is one of the most common errors in any flat twist out tutorial, and it collapses the definition before you even finish opening the section.
How to separate and fluff for volume
Once all your twists are open, resist the urge to run your fingers through your hair immediately. Let the initial curl pattern settle for about sixty seconds before you do anything else. This gives the curls a moment to fall naturally without you pushing them into positions they wouldn't hold on their own.
Separate your curls by gently pulling small sections apart at the root using just your fingertips, not your nails. Work through one section at a time rather than grabbing the entire style at once. After separating, cup the ends of your hair and push upward gently to create volume and lift at the roots without disrupting the curl clusters you spent time setting.
Step 6. Refresh, protect at night, and fix common issues
A good flat twist out tutorial doesn't stop at the take-down. What you do on days two and three determines how long your style stays wearable and defined without redoing the entire set. Protecting your curls overnight and knowing how to troubleshoot quickly keeps your results looking intentional between wash days.
How to refresh your style on days two and three
Fill a spray bottle with a mix of water and a small amount of your leave-in conditioner, roughly three parts water to one part leave-in, and mist sections lightly before scrunching upward. Don't soak your hair. You just need enough moisture to reactivate the product already in your strands and revive the curl pattern without restarting the drying process from scratch.
Follow this quick refresh routine each morning your style needs a reset:
- Mist sections lightly with your water-and-leave-in mixture
- Apply a fingertip-sized amount of curl cream to any sections that feel dry or frizzy
- Scrunch upward from the ends toward your roots
- Air dry or diffuse on low for five to ten minutes before going out
Protect your style overnight
Sleeping without protection is the fastest way to turn defined curls into a tangled, flat mess. A satin or silk bonnet keeps friction away from your hair while you sleep, which preserves curl definition and reduces frizz buildup between wash days. If you don't have a bonnet, a satin pillowcase works as a backup option, though a bonnet gives you more consistent coverage through the night.
Gather your hair loosely at the top of your head before putting on your bonnet to keep the roots lifted and prevent the curls from flattening overnight.
Fix common flat twist out issues
Knowing how to troubleshoot saves you from redoing your whole set unnecessarily. Frizz at the roots usually means the twists weren't fully dry before you opened them, or your hands created friction during the take-down. Apply a small amount of oil to your fingertips and smooth downward lightly along the root area to calm it.
Limp or loose definition typically points to too much heavy product weighing your strands down during the set. Next time, reduce the amount of butter or cream per section and use a medium-hold curl cream instead of a thick styling butter as your primary hold product.
A simple next step
You now have everything you need to work through a complete flat twist out tutorial from start to finish. The technique takes practice, but each attempt teaches you something specific about how your hair responds to sectioning, product, and drying time. Your first set won't be perfect, and that's expected. What matters is that you go through the full process at least twice before adjusting anything, so you can isolate exactly which variable is affecting your results.
Your results will improve consistently once you commit to clean prep, patient drying, and a careful take-down every time. The right products make that process easier, and that's exactly what we're building toward. Scatter is formulating custom styling products designed specifically for textured hair, made to give you this kind of definition without extra effort. Get early access and follow along with the process at scatterhair.com.